A Complete Guide to Server Migration

server migration steps

Getting ready for another server migration and unsure of what steps you need to take?

If your website or application is changing or growing over the months and years, then it is nearly inevitable that at some point you’ll need to change servers.

When the time comes, be prepared with the following guide on preparing your server and team for migration day and beyond.

A server migration is copying or moving critical data from one server to another, as well as configuring that target server to replace the first.

What is a Server Migration?

A server migration is the term used to describe copying or moving critical data from one server to another, as well as configuring that target server to replace the first. Server migrations in the context of web hosting might revolve around setting up web server and database software, copying over websites and their configurations, and changing DNS to direct visitors to that new server.

Why Should I Consider a Server Migration?

Server migrations may need to happen for a number of reasons. Organizations may migrate to:

  1. Take advantage of new technology or better service, or to ensure that the operating system (OS) and the hardware beneath it stay up-to-date with current technology.
  2. Move to the cloud for increased flexibility or scalability.
  3. To economize and consolidate hosting and reduce CapEx.
  4. Replace aging infrastructure at the end of its lifecycle.
  5. To expand and distribute hosting to help reduce load at a single point and achieve high availability.

Migrations should be handled with utmost care. You could sink hours of time, effort, and money into a migration only to find yourself onto the wrong server solution, or worse, with downtime and profit loss. It takes considerable planning and forethought to migrate your data onto an optimized server that is right for you. After all, on-average downtime can cost an enterprise $686,000 an hour, so your organization’s success absolutely depends on a successful migration.

How Do I Plan for a Server Migration?

Despite the fact that server migrations are quite common, even the most experienced IT professionals experience nervousness when it’s time to actually make a move. With so many moving parts and required precision, it is very easy – and very common – for migrations to be approached with at least a little anxiety.

Alleviate tension by planning ahead for the migration.

It is important to think about data migrations early, because planning ahead is particularly critical for ensuring smooth, fast migrations that deliver the intended benefits without causing a lot of headaches along the way.

While a checklist is important to have, moving to a new environment is a complex procedure, and even knowing what belongs on the migration checklist requires careful consideration.

Organizations that do not leave a long enough lead time for their migration project often find that they experience business disruptions or unexpected costs, even if they do everything else right.”

A clean data migration plan requires extensive system exploration and preparation by the company’s IT personnel, but even after the most diligent preparation, surprises are possible. Because several of the steps require the attention of IT teams or may consume a large amount of bandwidth, those steps should be carefully scheduled.

A complete and accurate picture of your existing infrastructure, including all data, hardware, software, and network components is necessary for a successful data migration. A full documentation of your infrastructure is used to properly architect your new environment before the migration even begins, and enables you to avoid missing anything when the migration is performed.

This resource also informs the rest of the planning process. Performing a thorough discovery can also have the side benefit of uncovering potential future problems, like forgotten web applications running an unsupported scripting language.

Preparation takes many forms beyond the initial exploration phase, including scheduling, communicating with staff, and technical measures such as updating the LAMP stack if necessary, along with code and plugins.

5 Step Server Migration Plan

  1. Preparing Your New Server
  2. Assess Data Fidelity
  3. Data Transfer
  4. Testing (QA/QC)
  5. Changing DNS and “Going Live”

As we mentioned, a complete and successful migration is made up of a number of steps that can be performed sequentially. Those steps tend to fall into one of five primary categories that make up the overarching process of a migration.

Understanding how these broader steps fit together, and what is included in each, is critical to developing your exact migration strategy in the future.

1. Preparing Your New Server

In the simplest terms, think of a server migration as moving from one home to another. If you want to bring all of your possessions with you, then your new home needs to have enough space for all of your furniture, right? And, if you are used to having, say, a double sink vanity in your bathroom, you may want the same features in your new home.

Migrating to a new server is much the same. All of the data associated with your website and applications needs to fit properly and in the right place on your new server. As a result, it is critical that your new server be properly sized and prepared for any incoming data and digital assets. Additionally, make sure that services and packages that your sites depend on are installed and available in the new environment.

Key Questions to Consider During Server Preparation

  • What is your organization’s planned growth over the next five years, and what infrastructure changes will this require?
  • Are all the right parties involved or informed of the planned migration? Think about site editors, administrators, developers, visitors or end users, and your hosting provider(s).

TIP: Build in approximately 20% extra storage space when migrating. During the migration, you’ll need a little extra room to unpack and install the data that’s being migrated, and you will want some room to grow as well.

2. Assess Data Fidelity

The process of making sure all data is accounted for before the migration, and properly installed after, is of critical importance. Losing even a tiny fraction of your data in transition, such as one CSS file or one connection string, can impact the performance of your entire site or application.

We recommend spending some time prior to the migration taking note of what parts of your site are critical, and what parts interact with or engage with other services.

For example, plugins and themes that affect multiple pages should be checked both before and after migration to ensure identical functionality.

Key Questions to Consider During Data Fidelity

  • What is the quality of your data in your old server? Are there a lot of static files, or dynamic databases?
  • Do you have a data governance plan in place to ensure measurement, tracking, and better decision making during the migration process?
TIP: Make an external backup of your entire website before migration. That way, you can rest easy knowing that you have a copy safely stored in the event of a problem.

3. Data Transfer

Once you have prepared your new server and properly secured all data to be ready for the migration, it’s time to finally make the copy.

Data transfer is typically the most time-consuming part of migration. The bandwidth available between your old server and the new server (or between your old hosting provider and your new hosting provider) essentially serves as the conduit for the migration. The more bandwidth you have, the faster the data can be migrated.

Key Questions to Consider During Data Transfer

  • Are all parties on the same page regarding when data transfer will take place?
  • Is there a clear POC at your old hosting provider and at your new hosting provider?
  • Are there any major initiatives or high-traffic events planned during or around the planned migration timelines?

TIP: Let anyone with access to the site know when the migration is going to happen and how long it is expected to take. Putting a “freeze” on any websites or applications will better ensure that no new content or data is lost during the migration.

4. Testing (QA/QC)

Once you’ve actually migrated the data to your new infrastructure, it’s time for testing.

Checking for full functionality and complete data transfer may be time consuming and cumbersome, but that is time well spent to prevent discovering an issue at a much later date. Because it is usually the part of the process where surprises are most likely, it can also vary significantly in how long it can take. Organizations often find that leaving an adequate amount of time to fully and properly complete the testing process is much easier if planned well in advance.

Conducting rigorous testing is how organizations identify unanticipated issues, evaluate the effectiveness of their strategies for dealing with known issues, and confirm the many details about how the process and running in the new environment will work.

Finally, document HOW you will perform testing post-migration to ensure quality assurance and quality control.

Key Questions to Consider During Testing

  • Have you verified appropriate request responses for APIs between applications and servers?
  • In multi-server setups, are public and private traffic moving along the appropriate networks?
  • Are your site(s) or application(s) performing as expected?

TIP: Reference your previous site and server during the testing process to see if anything looks off or incomplete. So long as the prior server was functional, it can provide a good road map for what your website should look like in its early life on the new server. Sometimes, existing site issues can be uncovered during migrations!

5. Changing DNS and “Going Live”

Now that you’ve migrated all of your data, applications, and websites to your new server and performed sufficient testing, it’s time to switch your DNS so traffic goes from the old server to the new infrastructure.

Switching DNS is actually a relatively simple process in most cases. We suggest your DNS switch take place during a time of low traffic and low usage. The middle of the night or the weekend can be the best time for the change.

Key Questions to Consider When Switching DNS

  • Have you double checked there are no business-critical events in the next 72 hours following “go live?”
  • Are all parties clear on their duties for the “go live” event?
  • Do you have a backup, reversion, or correction plan in case something goes wrong?
TIP: Know who your DNS provider is for all involved domains, and let your DNS provider know that you have a migration upcoming and when you will be changing the DNS. In the event of an issue with the change, your DNS provider will already be advised that a migration is in progress, and be more able to jump in and help.

Keep the Old Server Active as Short-Term Protection

Curious what to do with your previous server now that it is not in use? Our recommendation is to leave the old server active for at least a week or two as a point of reference and fallback option in the event an unknown problem rears its head.

Leaving your old server running for a transition period offers excellent protection against the most unforeseen issues.

What Should You Avoid During Server Migrations?

Avoid the following during server migrations:

  • Avoid scheduling a move immediately before a critical period for your business, such as Black Friday for an online retailer, to prevent a situation in which a minor problem needs to be fixed in an unrealistic time frame and becomes a major disruption.
  • Migrations should generally be performed during off-hours or times when a minimal amount of business is expected. This limits the chances of a disruption, but also gives the IT team an opportunity to focus solely on the migration, and prevents the legacy environment from being overwhelmed or the network from becoming saturated.
  • Avoid starting a migration until the exploration period is complete. An incomplete exploration is one of the main sources of preventable problems in migration projects of all kinds.
  • Notify staff outside of the migration team about the migration, including migration timelines, the changes expected to occur, and responsibilities, if any, that may be included as part of the project. It may be necessary to create or make available documentation and have a window of time in which IT personnel can assist other staff or end users with any initial set-up.

How Can a Service Provider Help With Server Migrations?

Most service providers offer to help with migrations, addressing a significant pain point for their potential customers. However, not all hosts have the combination of customer migration skill and motivation to follow through in a way that actually makes the experience as smooth as possible.

The requirements for migrations are significantly different depending on what is being migrated, and the environments involved.

As we previously wrote about migrating data between cPanel servers, service compatibility is the real magic of migrations. The magic spells, in this case, are the configurations and combinations of versions which will work together.”

This can get quite complicated.

In the discovery and documentation portion of the process, your web hosts’ migration veterans can work with the organization’s IT administrators to make sure that all relevant information is identified from the beginning, so they know what to look for. They can also help estimate how long some of the steps will take, including the final move.

Important details about how a particular kind of environment runs, such as ensuring quorum is established in a server cluster, may be obvious to migration experts, but not so clear ahead of time to in-house IT staff in the midst of a major operation. Likewise, after helping organizations through many migrations, service providers can help IT teams anticipate some of the questions they are likely to be asked by staff.

The experience service providers gain from migrating customers is only part of the expertise organizations can benefit from when making a change.

Crafting a new environment to suit your business’ needs is challenging, even once you have completed a thorough discovery, and guidance from professionals who have detailed knowledge of all of the prospective new environment’s elements can be invaluable to making the right move. Likewise, the experience of experts in storage and networking, your operating system, and the particular systems you are migrating from and to can all be valuable resources during the data migration process.

A service provider with extensive experience assisting customers in different kinds of migrations can be an invaluable asset. From exploration and creating a project plan through testing and execution, there are numerous potentially expensive pitfalls that organizations can avoid with the right help.

A Better Understanding of Successful Server Migration Steps

Server migrations are simple to understand and yet often complex to execute.

Believe it or not, that’s a great thing!

The overarching concepts that make up a successful migration mean anyone can do them, and the details of each step, while often numerous, are not necessarily difficult. That said, one of the best things you can do to ensure a successful and complete server migration is to engage experts that know the path and can guide you on the journey.

Here at Liquid Web, our Most Helpful Humans in Hosting™ perform thousands of migrations every year, and understand what roadblocks to avoid and pitfalls to navigate.

If you are considering migrating to a new server, get in touch now. We would be happy to discuss with you what goes into a successful server migration, and help architect the right infrastructure for your needs.

Migrating to a new server is a big decision, and a process best undertaken with a trusted partner by your side.

Struggling With Downtime From Your Current Host? Get Your Complete Migration Checklist.
Datasheet - Migration Checklist

The post A Complete Guide to Server Migration appeared first on Liquid Web.

How to Protect Your Business From Ransomware

ransomware protection

Is your business protected from the next ransomware attack?

There is danger in ransomware attacks, as well as in ransomware variants that keep emerging to target servers, websites, and specific organizations such as local municipalities. Ransomware maintains its position as one of the most profitable business models in cybercrime.

Recent figures show that ransomware has filled hackers’ pockets with $11.5 billion in 2019, compared to $5 billion in 2017.

In the first half of 2019 alone, Sodinokibi (REvil) ransomware strains claimed 23 municipal governments in Texas, while two small cities in Florida were scared by Ryuk ransomware into paying over $1 million to regain access to their systems, after being locked out for two weeks. It could cost an extra $1 million to restore the system and ensure everything is up and running, even if the attackers follow through on their end of the bargain when the ransom is paid (which they rarely do).

Hackers rarely unlock systems after the ransom is paid out.”

Ransomware attacks are a pain, and looking at Gartner predictions for 2020 – hackers will keep using this type of attack.

The research company warns that 99 percent of the vulnerabilities to be exploited in 2020 will not be unknown in the industry, showing some IT executives ignore software updates and patches to Internet of Things (IoT) systems that are already known to be vulnerable, either because they are not designed with in-built security or the system may not be patchable. These exploits will account for over 25 percent of enterprise attacks, Gartner predicts.

Companies that fall victim to ransomware experience, in most cases, experience permanent critical and proprietary data loss. As they struggle to contain the attack, they will have to consider the financial implications driven by the disruption of operations, by efforts to rebuild the system and, unavoidably, the effect on the brand’s reputation.

recognizing a ransomware attack

What is Ransomware?

Ransomware is malicious software that seeks out critical files and devices to encrypt them for extortion.

How Does Ransomware Work?

The most common initial infection vector is a phishing or spear-phishing email that uses social engineering techniques to manipulate the user into either clicking on a malicious link or downloading an infected executable file.

Once the payload is activated, it will contact the Command and Control (C2) server. It will then encrypt the system and hold the data hostage. Instead of trying to make off with data that they can sell, they hold that data for ransom within a certain timeframe dictated by ransomware.

Their mentality is that if the data is valuable enough to be protected by layers of security, then surely it is valuable enough that the business would not want to risk its loss. And the business may even pay a hefty bitcoin ransom for its safe return.

Ransomware is virtual kidnapping.”

This is the idea behind ransomware – an insidious form of malware which has seen a huge upturn in use over the past several years. Whether the data is personal files, business or accounting information, or a set of passwords, data can be incredibly valuable to its owner.

And anyone can be a target of ransomware, as evident by an ransomware attack over the holidays to an unpatched PulseSecure VPN with Travelex.

It doesn’t matter if you are a small business, a casual computer user, or a corporation with security in place. If there is a weak link in the chain, an attacker can compromise a system and wreak havoc against your business.

All it takes for ransomware to take effect is that an executable is able to run on a computer.

Ransomware attacks can be fast and deadly, quickly encrypting all files on your computer or even worse, your organization. User’s often restart their PCs or turn them off instantly, and hackers have even added a function to deal with this. Most of the time files won’t be encrypted until the computer or server is restarted, effectively locking the user out of the entire system.

What are Usual Attack Vectors to Watch for Ransomware?

Phishing attacks are generally meant to steal critical information, which includes data such as bank details, payment information, social security numbers, address, or date of birth. Basically this can include any information that could be used to commit financial fraud, perform illegal transactions, or even create fake beneficiaries for mortgages or insurance claims.

Ransomware can be easily attached to email spoofing attacks.

To make sure they get the information or to manipulate the user into activating the payload, hackers resort to sophisticated techniques such as sending emails impersonating credit unions, banks, the IRS, and even educational institutions or legitimate companies.

Software vulnerabilities are another entry point for ransomware, if left unpatched. Other points of entry can include unpatched Remote Desktop services, botnets, ads, infected installers, and web injects.

A recent report by security company RiskSense found that Microsoft products had 27 vulnerabilities that would be targeted by ransomware, out of which eight were Windows-related, while Microsoft Edge, Internet Explorer, and Microsoft Office had three vulnerabilities each. Five vulnerabilities were found in Oracle and Adobe products.

What are the Types of Ransomware?

Ransomware comes in different shapes and sizes, yet there are three main categories: scareware, lock-screen, and file-encrypting ransomware.

Some, such as CryptoLocker and SimpleLocker, can’t self-replicate, so they use a trojan downloader to install the malicious payload. TeslaCrypt was originally believed to be a CryptoLocker variant and was responsible for almost 50 percent of ransomware attacks in 2016. It targeted video game archives and distribution services, and was regularly improved, which made it impossible to restore files.

Some of the top ransomware attacks in the past five years manipulated Microsoft vulnerabilities to infiltrate and encrypt networks. 2017’s global WannaCry ransomware attack was worse than CryptoLocker, the first detected file-encrypting ransomware.

WannaCry deployed hacking tools stolen from the NSA. Hackers used the EternalBlue exploit that went after vulnerabilities in Microsoft’s Server Message Block (SMB) protocol – a network file-sharing protocol.

Many organizations left the port open for the worm, because they never installed Microsoft’s patch. The EternalBlue exploit was later used by NotPetya, also known as GoldenEye ransomware, allegedly authored by hackers backed up by the Russian government.

antivirus is a layer of protect against ransomware attack

Can Antivirus Software Protect From Ransomware Attack?

Free antivirus software is not enough to fight ransomware. Ransomware infections can even hide behind a fake free antivirus or other free online tools.

It is wisest to invest in prevention and response to mitigate risks. A robust security software with an anti-ransomware component is critical for any organization to ensure network protection.

An antivirus solution with signature-based detection will keep a close eye on all activity, including looking for malicious software and suspicious behavior in real-time. Some hackers have figured out ways to bypass traditional signature-based malware detection, which means they have a small chance of success.

A good antivirus solution will deliver malware, spyware and ransomware protection with a behavior monitoring component, besides the signature-based detection, specifically designed for ransomware monitoring.

A priority for any antivirus software is to use the anti-ransomware component to immediately detect it, but if the payload makes it into the system, then the antivirus might not succeed in removing the ransomware.

Security companies are working on improving their solutions to block sophisticated ransomware. There are a number of antivirus solutions that can remove ransomware, but the encrypted files are usually lost and the system can only be restored if the OS is reinstalled. In this case, multiple backups in both online and offline repositories are critical to easily restore the system in case of infection.

There is only so much that antivirus software can do if users are not trained about security threats and safe browsing. Sometimes employees are the weakest link and thus the most preferred target in ransomware attacks.

While antivirus software delivers basic protection against less sophisticated, first-generation ransomware variants, it is up to each user to keep all software and operating systems updated, not click on suspicious links or download suspicious attachments, establish a recovery plan, and regularly back up files offline.

5 Steps to Protect Your Organization From Ransomware

Keeping your business and technology secure starts with a few basic things– having virus and spam protection on all corporate devices, for example. But just because some of the measures we take seem like common sense, there is no single foolproof method to protect your company.

However, incorporating these steps into your business-wide security practices will certainly help you avoid disastrous and unexpected situations.

Here are a few steps you can take to reduce the risk of your data being held for ransom.

1. Keep All Systems Up-To-Date

Security patches and updates are vital for security in our tech-driven world.

Unless you know that an update will absolutely brick your system, you should always be applying the latest patches and updates for software and operating systems. Outdated or unpatched systems represent a huge security risk for your business, even though it can easily be avoided.

Most attackers go for “low-hanging fruit”. Systems that are connected to the internet and don’t have the latest updates and patches are the first targets.

Hackers most likely didn’t target you or your business directly to find a vulnerable computer; your PC may have been one of many random targets a hacker is randomly attacking.

2. Educate Your Employees

Something as harmless as opening a suspicious email attachment can wind up infecting your entire network with ransomware.

It’s imperative that you instruct your employees on how to recognize phishing attempts and what could be a malicious email or application. The more they understand the threats facing your business, the less likely they will be to put you at risk unintentionally.

Educating employees on proper security practices and guidelines for your organization can help stop a dire situation from happening, and get any suspicious activity in the hands of your security team. Even the best antivirus programs will not detect every threat, so a well-versed employee is one of the most effective measures to prevent the threat of ransomware.

3. Secure Your Server and Email

Even educated employees can make mistakes, and the more you can do to prevent those mistakes, the better.

By incorporating anti-spam and anti-virus solutions into your email server and networked computers, you have a tool that can automatically detect and block bad attachments and executables from being downloaded or running.”

While this will not guarantee that you will avoid infections from ransomware, it can go a long way in protecting even the most vulnerable systems.

Reducing the amount of incoming spam will help your organization lower the amount of times that risky attachments ever get to your user’s mailbox. This lessens the chances that an employee can even make a questionable decision.

Having anti-virus installed works much the same way. Up-to-date antivirus software can detect malicious executables before they are ran on a system, stopping a bad attachment that was downloaded, for example.

Antivirus and spam protection is never foolproof, but can be a last line of defense if an attack was imminent.

At Liquid Web, using our proprietary ServerSecure software and additional antivirus solutions can help protect and remediate systems from the dangers of ransomware.

4. Avoid Unsecured and Public Connections

An unsecured wireless network can be an open door into your organization’s network.

According to research from Kaspersky Labs, 24.7% of WiFi hotspots do not use encryption at all, and another 2% use WEP – which is functionally the same.”

If your employees access business resources through these unencrypted networks, it would be easy for an attacker to install malicious files to your servers.

Giving employees a secure means of remote access is important, whether you need to use SSH, VPN, FTP, or RDP. That way, even if a user accesses business-resources from an unsecured connection, there is a secure and encrypted layer between the insecure network and potentially malicious attackers.

VPNs are a common way companies navigate these risks.

A secured VPN connection puts another secure server in between user’s and your network’s resources. Your IT team should be able to handle this setup.

Learn more about how Acronis Cyber Backup, Liquid Web’s Dedicated off-server backup solution, works in this exclusive webinar.

5. Backup Your Data – And Protect Your Backups Off-Site

Backup servers are the bane of ransomware developers. With a backup from Liquid Web’s Dedicated off-server service, Acronis Cyber Backup, ransomware is no longer effective.

If you have reliable and automated off-site backups of your data, even if a hacker encrypts everything on your server, you have daily or hourly copies stored on another network via encrypted channels.

If an attack takes place and compromises your network or a handful of computers, you can immediately take everything offline, secure your network by updating passwords and firmware, and restore your last unaffected backups.

By downloading and scanning your backups for problems, or by identifying how an attack occurred, you can safely and securely bring your old files back and not lose more than an hour or a day’s worth of data.

eBook - SMB Security Checklist

The post How to Protect Your Business From Ransomware appeared first on Liquid Web.

Meet a Helpful Human – David Richards

Helpful Humans

We’re the employees you would hire if you could. Responsive, helpful, and dedicated in ways automation simply can’t be. We’re your team.

Each month we recognize one of our Most Helpful Humans in Hosting.

David Richard’s path to Liquid Web differs from most. He started his career as an English teacher at a middle school in the Upper Peninsula of Michigan, enjoying teaching immensely. He then moved to the Lansing area to try his hand at teaching college. All along the way, he continuously dabbled in technology. When his time at the college came to an end, he joined Liquid Web as a Windows Support Administrator.

Having spent most of his time working with Windows, he thought he knew plenty about Windows servers. He quickly discovered that he knew nothing about them when it came to web hosting and the plethora of ways customers use Windows Servers. After a fantastic year and half with the Windows Team, David landed a dream role as the Technical Writer for the Help Center. Not only does he get to work with technology, but also gets to use his language and writing skills to help the company and our customers.

We caught up with David to find out what gives him passion at Liquid Web.

Meet a Helpful Human - David Richards

Why did you join Liquid Web?

I’d heard great things about the company for years. As a long time Lansing resident, I knew many employees, and they all spoke highly of the work environment and the company as a whole.

I’ve always loved technology, so that was my biggest draw to joining the Hosting Industry. I love working in an industry that makes technology solutions available to small and medium-sized businesses that would otherwise have a difficult time implementing the servers/services they need to compete in the market.

Is there something specific at Liquid Web that you just love?

I really love the drive everyone has to solve each and every problem until resolution. I was challenged from day one to solve problems that came to me, not shelve them or “pass the ball,” even if the problem wasn’t part of my responsibilities. Every employee strives to be the best at what they do and actually seeks out problems to test themselves against. I don’t know if it’s the gamer background or something about being nerds, but everyone I’ve worked with gets very excited when they encounter a challenge they haven’t seen before. There is a definite thrill of victory that lives in our culture.

At the end of the day, helping the customer succeed in their business and have a positive experience while keeping their server and website(s) running smoothly is what matters most at Liquid Web.

In your eyes, what’s the difference between Liquid Web and other employers?

Liquid Web, from people and technology, to processes and projects, is laser-focused on becoming the Most Loved Host on our planet by being the most helpful we can to our customers, every time. At other companies, I was encouraged to simply stay in my lane and not go out of my way to do anything extra for others. At Liquid Web, we are all encouraged to help each other and our customers as much as we are able.

What is the biggest milestone you’ve accomplished?

While I was still a Windows Support Administrator, I wrote an article on How to Install Pip on Windows as part of our Internal Writing Program, which is a unique and fun program at Liquid Web designed to leverage internal expertise to generate new content. It was a simple little article that now has over 1.5 million pageviews since it was published in January 2019, and has the highest pageviews monthly of any KB on our site.

Tell us about a truly rewarding experience you’ve had with a customer.

One of the most rewarding (and terrifying) experiences I’ve had at Liquid Web is helping customers with migrating their servers. Getting server migrations right is critical for our customers’ businesses, as we need to ensure all of the data is moved successfully, and their sites and applications work as intended and are online as much as possible during the process. As I performed more and more server migrations, it became clear that my primary responsibility, besides performing the migration, was to make a potentially very difficult and scary transition much easier for our customers through communication.

Hearing the customers’ stress levels dissipate as I communicated during each stage of the migration, and created a positive experience with them, was truly rewarding. And it’s just as rewarding now to help customers proactively by providing help with articles on our Knowledge Base and Help Center databases.

What is one thing you wish our customers knew about their hosting?

I wish more customers were aware of how important it is to keep their code, applications, operating systems (OS) and software up-to-date. So many issues can be resolved by installing the latest patches and updates on a regular basis. Updating and migrating can be a scary process, but not nearly as scary as losing all your data to a successful ransomware attack.

Work aside, what are some of your hobbies?

My biggest hobby is spending time with my family. I have a beautiful wife and two wonderful daughters that occupy the majority of my time. I also love to read Science Fiction and Fantasy novels, and I enjoy dabbling and tinkering in the garage on small projects.

What is your favorite TV show?

I’ve watched through Friends a number of times, as well as The Mentalist. At the moment, I’m really liking The Prodigal Son.

What is your favorite app?

Based on usage alone, it would be Slack. Both Liquid Web and my church use Slack for all kinds of conversations, and it has been especially useful during quarantine in 2020.

If you could have dinner with one famous person [dead or alive] who would it be?

I’d probably have dinner with Blackbeard, one of the most cunning and feared pirates during the early 17th century. He seems like a very interesting guy, and I’d see if I could find out where he hid all his treasure.

The post Meet a Helpful Human – David Richards appeared first on Liquid Web.

Physical Fitness Hacks You Should Implement Right Now

There are a lot of things that play a massive part in the process of improving your wellness, and this is something to consider right now. You have to think carefully about the different ideas that are going to play a part in helping you take things to the next level in terms of your physical fitness. This is something that you need to make the most of right now, and there are a lot of things that play a role in this.  Pixabay It is crucial that you do as much as you can to improve the way you live your life, as well as the physical fitness and well-being you strive for. This is something that plays a massive part in the decisions you make right now, and you need to make sure you come up with ideas that can help you to play a part in this, and physical fitness is essential. Here are some of the key fitness hacks you should be using right now. Keep it Up One of the key things you need to remember is trying to take steps to help you improve your fitness by keeping up with your exercise. This is one of the most important things that you need to look into right now, and there are a lot of elements that play a role in this moving forward. Try to consider what it takes to improve this, and there are loads of ideas that will let you take things to the next level in terms of having a regular workout regime.  Set a Good Example to Your Family Setting a good example to the family is really important when it comes to improving and assessing the health and fitness of everyone in your household. You need to lead by example and do as much as you can to come up with ideas that are going to help you focus on sticking with your fitness commitment, and setting an excellent example in the process. This is something you need to consider moving forward right now.  Dress for the Part Dressing for the part is one of the biggest considerations you need to make when it comes to taking your fitness and physical exercise more seriously. You are going to need to make sure you think about what it takes to bring this forward and ensure you look as great as possible. Dressing in the right kinds of workout clothes is really key, and that means looking at rainbow tights as well as choosing the right sneakers.  Diversify Your Exercise Diversifying your exercise and fitness regimen is one of the best things you can do to keep interested and invested in working out. There are a lot of things you can do to help with this, and it is important that you make sure you are focused on making the most of this moving forward. Whether it’s running, cycling, swimming, hitting the gym, or any other form of fitness, it is important that you have a good range to choose from.  Making the most of your fitness regime and well-being is one of the most important things you can do. This is so important when it comes to making the right decisions in life, and helping you to take things to the next level. Try to come up with some of the best possible ideas that are going to allow you to make the most of this, and these can help you in that regard.

The post Physical Fitness Hacks You Should Implement Right Now appeared first on Hey Aprill.

Restriction on WO Close unless Quality Transaction is clear

As you all know in Sage X3, Users can close any Work Order after Production Tracking by using WO Close screen. But one of our client wanted to restrict that WO Close functionality until that particular Work Order is Completely Tracked and Quality Control Transaction is done. Now we will see both the conditions one by one:

1. WO should be Completely Tracked:

As you can see in the below screenshot, there are three checkboxes on Production Tracking Screen i.e. Operation Tracking, Production Reporting and Material Tracking. If all the three checkboxes are ticked after creation of Production Tracking entry for any particular Work Order then only that Work Order will be considered as “Completely Tracked WO”. And if in case one of them or two of them are not ticked then that work order is not completely tracked WO.

New Stuff: How to store CLOB variable data to the table through webservice

[Production Tracking Screen]

[Production Tracking Screen]

In Production Tracking Number – 101/MFG/19-20/0056, all the three checkboxes are ticked which means 101/PROD/19-20/0077 is the completely tracked Work Order.

2. Quality Transaction should be done:

In Quality Control screen of Stock module, if the transaction is done against the same Production Tracking Entry and Quality “A” or “R” is entered in quality control detail for total quantity of that WO then only that Transaction will be considered as complete. If the status of the work order products is in “Q” then it will consider that Quality Transaction is not clear. That means the work order Products status should be either Accepted (A) or Rejected (R) but it should not be in the Quality (Q).

As you can see in the below screenshot, Work Order – 101/PROD/19-20/0077 is in “Q” status and quality transaction is not done for this Work Order.

[Quality Control Screen – Q Status]

[Quality Control Screen – Q Status]

If both the conditions are satisfied then only Work Order should be allowed to close. But if one of those two conditions is not satisfied and you click on Close Button for that particular Work Order in WO Close screen, then it will give you an error that “WO cannot be closed unless it is completely tracked and quality has been done” and will not allow to close that Work Order as shown in the below screenshot.

[WO Close screen – Error Message]

[WO Close screen – Error Message]

As we already know, for Work Order – 101/PROD/19-20/0077, first condition is satisfied but second condition is not satisfied because of which it is giving an error when you try to close that order in WO Close screen.

After entering quality control detail in Quality Control screen, status has changed to “A” and both the conditions for Work Order -101/PROD/19-20/0077 are satisfied now. And user can close the Work Order easily. Refer below screenshot in which status is “A”.

[Quality Control Screen –  A Status]

[Quality Control Screen – A Status]

After clicking on close button, that work Order is closed easily without getting any error in WO Close screen and “Close” button is disabled automatically.

[WO Status - Closed]

[WO Status – Closed]

Hence with the help of this customization, WO Close functionality will get restricted unless it is completely tracked and quality transaction is done(A and R).

About Us

Greytrix – a globally recognized and one of the oldest Sage Development Partner is a one-stop solution provider for Sage ERP and Sage CRM organizational needs. Being acknowledged and rewarded for multi-man years of experience, we bring complete end-to-end assistance for your technical consultations, product customizations, data migration, system integrations, third-party add-on development and implementation competence.

Greytrix caters to a wide range of Sage X3, a Sage Business Cloud Solution, offerings. Our unique GUMU™ integrations include Sage X3 for Sage CRMSalesforce.com, Dynamics 365 CRM and Magento eCommerce along with Implementation and Technical Support worldwide for Sage X3. Currently we are Sage X3 Implementation Partner in East Africa, Middle East, Australia, Asia, US, UK. We also offer best-in-class Sage X3 customization and development services, integrated applications such as POS | WMS | Payment Gateway | Shipping System | Business Intelligence | eCommerce and have developed add-ons such as Catch – Weight  and Letter of Credit and India Legislation for Sage X3 to Sage business partners, end users and Sage PSG worldwide.
Greytrix is a recognized Sage champion ISV Partner for GUMU™ Sage X3 – Sage CRM integration also listed on Sage Marketplace; GUMU™ integration for Sage X3 – Salesforce is a 5-star rated app listed on Salesforce AppExchange and GUMU™ integration for Dynamics 365 CRM – Sage ERP listed on Microsoft AppSource.

For more information on Sage X3 Integration and Services, please contact us at x3@greytrix.com, We will like to hear from you.

Payment & Prepayment deletion through the custom button from Sales Order

In Sage X3, we are working on payment integration from x3 to the third party payment gateway. Here, we are doing sale/auth/refund/void transactions on the client’s payment gateway through Sales Order/Invoice transactions from X3. Here, we will provide prepayment & payment deletion functionality through the void button.

New Stuff:- How to change the LOT’s expiration date (for multiple sites) in Sage X3

Prepayment & Payment deletion in x3

As per the requirement analysis and the functionality provided, we are creating automated prepayment and payment in x3 on the click of sale button from Sales Order which will create Sale transaction in the payment gateway respectively. After the successful payment & prepayment creation, if the user wants to cancel or refund the transaction created on payment gateway, the adverse effect in x3 will be deleting the payment & prepayment created against the sales order.

Note:This will be only applicable if the respective payment and prepayment against the sales order is not posted in x3.

If the payment is posted for the sales order in x3, then the user need to manually run account cancellation process from the payment entry in x3 to cancel/refund the payment transaction in x3. There are many validations which we need to check while deleting the payment which are as follows:

  • Payment and prepayment should exist for the particular sales order.
  • Sales Order status should not be closed.
  • Payment against the sales order should not been posted.
  • Closing table whichever opened while deleting the payment and prepayment entry to avoid systematic error I.e. “Too many tables opened in x3”

In our analysis, we have found out there are few hurdles coming in the way while deleting the payment which we need to handle through code i.e to set default mask as sales order mask again to avoid different system errors.

Working:

Call AV_ANNULE2([L]CODE,FLGLOT) From SUBPAY3:

The above statement is written to call specific standard delete function from x3.

Delete [ZPYH] where NUM=ZPAYNUM

The above statement is written to delete payment entry from the payment table from x3.

Delete [ZDUD]  where NUM=ZVCRNUM

The above statement is written to delete prepayment entry from the prepayment table from x3.

Gosub AP_ANNULE  From SUBPAY3

The above statement is written to call the functions used after the deletion of the payment and prepayment entry from x3.

Gosub APRES_ANNULE From SUBPAY3

The above statement is written to call the functions used after the deletion of the payment and prepayment entry from x3.

Note: We need to handle any system error occurred during the customization of deletion of payment and prepayment entry against the sales order/invoice screen. Supposedly if we are opening masks or tables opened for our process then we need to close the tables and masks to avoid any type of crashing/error in Sales order/delivery/invoice transactions.

We can also provide the same functionality from sales delivery and invoice as well, whenever the user delete/close the sales order and the payment with prepayment is created (payment not posted)

Advantages:

Here, we are having the advantages :-

  • We don’t have to manually delete the payment & prepayment entries or run any account cancellation document from payment entry
  • All the functionalities runs from a single click from custom button to delete/cancel/refund transaction from Sales order/delivery/invoice.

This blog is used for understanding the process of deletion of payment and prepayment from Sales Order through code before payment posting and without effecting standard functionalities or crashing the screen. This blog’s functionality will provide users to delete payment and prepayment through sales order/delivery/invoice screen from a single click whenever the user want to cancel/delete/refund any sale transactions.

About Us

Greytrix – a globally recognized and one of the oldest Sage Development Partner is a one-stop solution provider for Sage ERP and Sage CRM organizational needs. Being acknowledged and rewarded for multi-man years of experience, we bring complete end-to-end assistance for your technical consultations, product customizations, data migration, system integrations, third-party add-on development and implementation competence.

Greytrix caters to a wide range of Sage X3, a Sage Business Cloud Solution, offerings. Our unique GUMU™ integrations include Sage X3 for Sage CRMSalesforce.com, Dynamics 365 CRM and Magento eCommerce along with Implementation and Technical Support worldwide for Sage X3. Currently we are Sage X3 Implementation Partner in East Africa, Middle East, Australia, Asia, US, UK. We also offer best-in-class Sage X3 customization and development services, integrated applications such as POS | WMS | Payment Gateway | Shipping System | Business Intelligence | eCommerce and have developed add-ons such as Catch – Weight  and Letter of Credit and India Legislation for Sage X3 to Sage business partners, end users and Sage PSG worldwide.
Greytrix is a recognized Sage champion ISV Partner for GUMU™ Sage X3 – Sage CRM integration also listed on Sage Marketplace; GUMU™ integration for Sage X3 – Salesforce is a 5-star rated app listed on Salesforce AppExchange and GUMU™ integration for Dynamics 365 CRM – Sage ERP listed on Microsoft AppSource.

For more information on Sage X3 Integration and Services, please contact us at x3@greytrix.com, We will like to hear from you.

How to change the LOT’s expiration date (for multiple sites) in Sage X3

In some business scenario customer wants to change the expiry date when product exist in multiple sites, of the existing Lot numbers of its existing stock, and they were hunting for a solution which could help them with this.

A lot number is an identification number assigned to a particular quantity or lot of material from a single manufacturer. Lot numbers can typically be found on the outside of packaging. For cars, a lot number is combined with a serial number to form the vehicle Identification Number.

The lot number enables tracing of the constituent parts or ingredients as well as labour and equipment records involved in the manufacturing of a product. This enables manufacturers and other entities to perform Quality control checks, calculate expiry date and issue corrections or recall  information to subsets of their production output. It also gives consumers an identifier that they can use in contacting the manufacturer and researching the production of goods received. For example, to trace back the origin of fish or meat, in case of a public health problem.
The expiry date is associated with a lot in stock. It indicates a usage end date for the stock of a product and is controlled in the issue movements. In Sage X3, there is a standard functionality, with the help of this user can modify the LOT’s expiration date for multiple sites.

Follow the below steps to modify or change the LOT’s expiration date:

Steps:

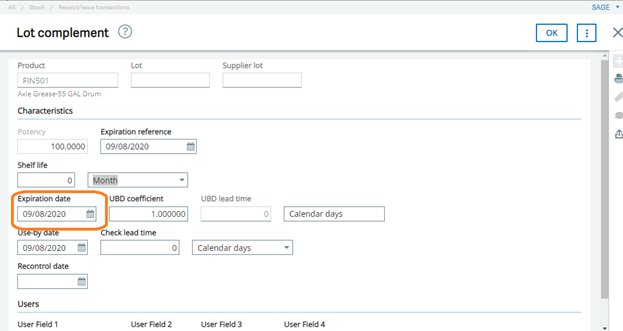
For example, we have FIN501 product at two different sites which has LOT expiration date is 08/09/20, as shown in below figure.

Fig: LOT complement
Fig : Stock by lot

Now we will modify the existing Product LOT expiry date with the help of below screen.

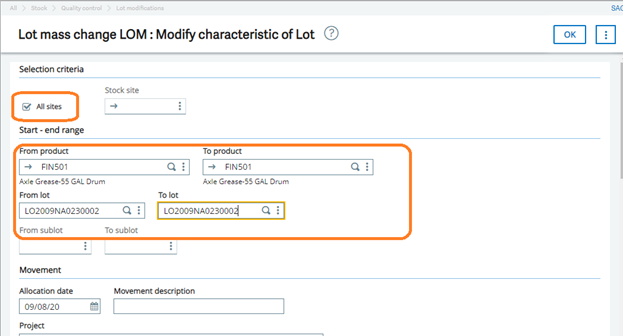
Navigate To: Stock > Lot modification > Lot mass change

  1. Select the All sites check box when the lot number is existing at multiple sites for respective product.
  2. Enter product
  3. Enter LOT number
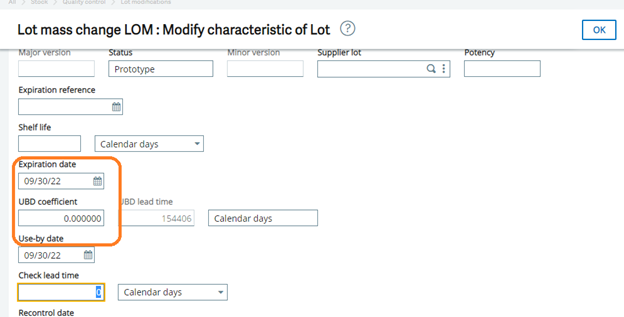
  4. Enter the LOT expiration date
  5. Click on OK.

Please refer the below figures for the same,

Fig: Lot mass change
Fig : Lot mass change

After clicking on OK button, it will display one screen to verify the entry.

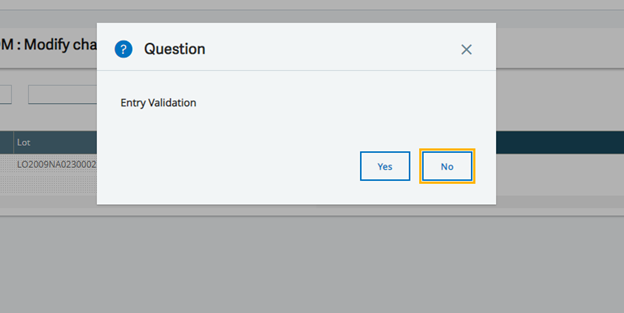
Now after saving the entry it will show one pop up message Entry validation select as a Yes, as shown in below figure.

Fig : Entry validation

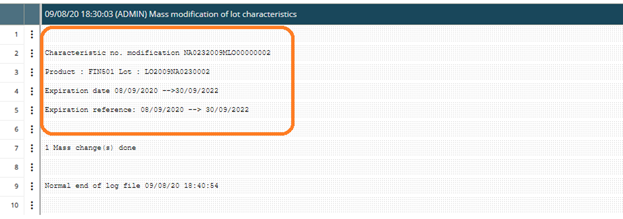
After this process log file will be generated with the modified data, as shown in below figure.

Fig: Log file

Now the Lot expiration date has successfully modified. You can check the modified expiration date with the help of stock inquiry screen i.e. Stock by lot screen.

Navigate To: Stock > Inquires > Stock by lots

1. Enter a product and click on search button

2. It will show the multiple no. of LOT number, you can check the respective Lot number expiry date, as shown in below figure.

Fig: Stock by lot

With the help of above steps user can modify or edit the LOT expiration date for multiple sites.

About Us

Greytrix – a globally recognized and one of the oldest Sage Development Partner is a one-stop solution provider for Sage ERP and Sage CRM organizational needs. Being acknowledged and rewarded for multi-man years of experience, we bring complete end-to-end assistance for your technical consultations, product customizations, data migration, system integrations, third-party add-on development and implementation competence.

Greytrix caters to a wide range of Sage X3, a Sage Business Cloud Solution, offerings. Our unique GUMU™ integrations include Sage X3 for Sage CRMSalesforce.com, Dynamics 365 CRM and Magento eCommerce along with Implementation and Technical Support worldwide for Sage X3. Currently we are Sage X3 Implementation Partner in East Africa, Middle East, Australia, Asia, US, UK. We also offer best-in-class Sage X3 customization and development services, integrated applications such as POS | WMS | Payment Gateway | Shipping System | Business Intelligence | eCommerce and have developed add-ons such as Catch – Weight  and Letter of Credit and India Legislation for Sage X3 to Sage business partners, end users and Sage PSG worldwide.
Greytrix is a recognized Sage champion ISV Partner for GUMU™ Sage X3 – Sage CRM integration also listed on Sage Marketplace; GUMU™ integration for Sage X3 – Salesforce is a 5-star rated app listed on Salesforce AppExchange and GUMU™ integration for Dynamics 365 CRM – Sage ERP listed on Microsoft AppSource.

For more information on Sage X3 Integration and Services, please contact us at x3@greytrix.com, We will like to hear from you.

How to enable serial number field in sales invoice screen in Sage X3

A sales invoice is an accounting document that records a business transaction. Sales invoices provide the business with a record of the services they’ve provided to a client, when the services were rendered and how much money the client owes the business. Typically, a sales invoice will include a description of the service provided, the amount owed and the deadline for payment.  A sales invoice is created by the business after they’ve provided products or services to a client, as a way to request payment.

We may need a basic important points to make a sales invoice such as:

  1. Customer Details
  2. Payment Terms.
  3. Payment Due Date.

Payment Terms: Its is a condition under which a seller will complete a sales . Typically, these terms may demand cash in advance, cash on delivery. Also the payment terms on your sales invoice, including the payment methods you accept (i.e. cash, cheque, credit card, debit card, visa etc.).

Payment Due Date: It is the date when payment should be received by the company. Also it clearly list the deadline for payment on your sales invoice. Eg(Payment due in 30 Days etc etc.).

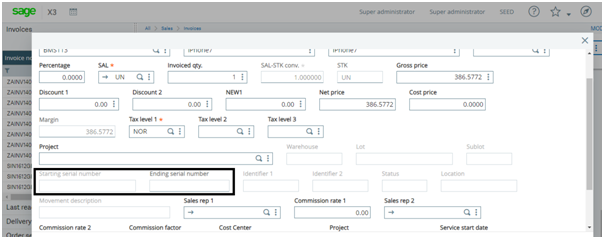
Now sometimes in Sage X3, we may find difficulties in entering the serial number manually in sales invoice screen as this field is always seen disabled in the screen. So, for solving these Sage X3 has a some in build functionality. Kindly follow below steps for enabling the serial number field in Sales Invoice screen.

Navigate to: Sales -> Invoices -> Invoices

Fig: Sales Invoice screen

As we can see in above screen shot, serial number field is disable. Now follow below steps to enable this field.

Step1:

  1. Open Sales Invoice  screen.
  2. Click on new button.
  3. Enter site, customer
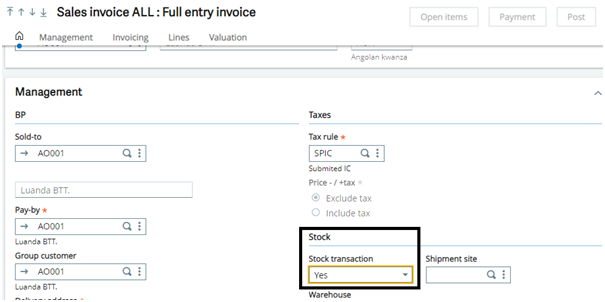
  4. Set stock transaction field as ‘Yes’. Refer below screen shot:

Navigate to : Sales -> Invoices -> Invoices -> Management tab

Fig: Stock Transaction field

By doing above steps , serial number field will get enabled in the lines grid.

Now follow below steps to display data in serial number filed in lines grid.

Step1:

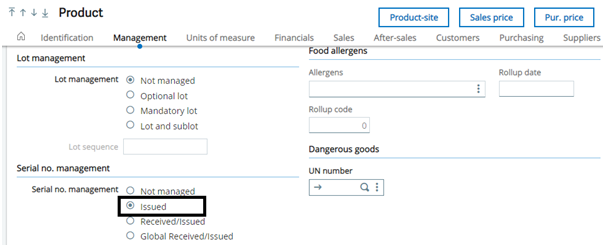
  1. Create new product or select product whose serial number management is set as ‘Issued’.

Navigate to: Common Data -> Products -> Products -> Management tab

Fig: Product Screen
  1. Now create sales invoice.
  2. Set stock transaction field as ‘Yes’.
  3. Enter product in lines grid.
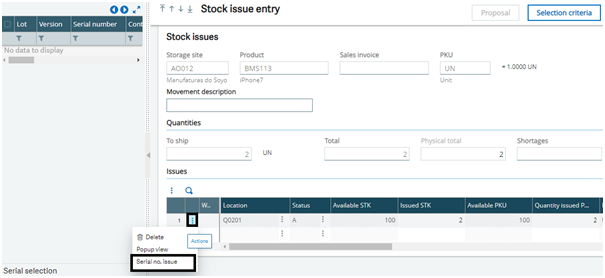
  4. After entering quantity, new screen is getting open name as ‘Stock issue entry’.
  5. Now go to action button and select ‘serial number issue’ button from the lines grid. Refer below screen shot of the same:
Fig: Stock Issue Entry screen
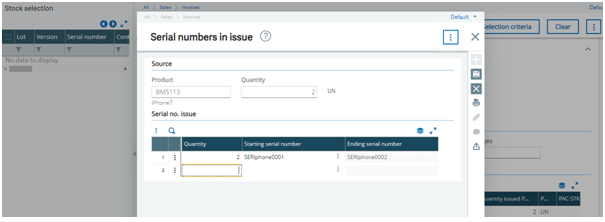
  1. After this, new screen getting opened named as ‘Serial Numbers in issue’.
  2. Enter quantity to issue.
  3. Enter ‘Starting Serial number’.
  4. Click on Save button.
Fig: Serial numbers in issue screen

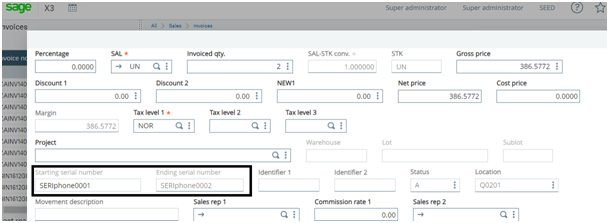
Now check serial number field data is visible in lines grid.

Fig: Serial Number Field

By doing all the above steps, the field will get enabled and data will get populated on the field.

About Us

Greytrix – a globally recognized and one of the oldest Sage Development Partner is a one-stop solution provider for Sage ERP and Sage CRM organizational needs. Being acknowledged and rewarded for multi-man years of experience, we bring complete end-to-end assistance for your technical consultations, product customizations, data migration, system integrations, third-party add-on development and implementation competence.

Greytrix caters to a wide range of Sage X3, a Sage Business Cloud Solution, offerings. Our unique GUMU™ integrations include Sage X3 for Sage CRMSalesforce.com, Dynamics 365 CRM and Magento eCommerce along with Implementation and Technical Support worldwide for Sage X3. Currently we are Sage X3 Implementation Partner in East Africa, Middle East, Australia, Asia, US, UK. We also offer best-in-class Sage X3 customization and development services, integrated applications such as POS | WMS | Payment Gateway | Shipping System | Business Intelligence | eCommerce and have developed add-ons such as Catch – Weight  and Letter of Credit and India Legislation for Sage X3 to Sage business partners, end users and Sage PSG worldwide.

Greytrix is a recognized Sage champion ISV Partner for GUMU™ Sage X3 – Sage CRM integration also listed on Sage Marketplace; GUMU™ integration for Sage X3 – Salesforce is a 5-star rated app listed on Salesforce AppExchange and GUMU™ integration for Dynamics 365 CRM – Sage ERP listed on Microsoft AppSource.

For more information on Sage X3 Integration and Services, please contact us at x3@greytrix.com, We will like to hear from you.

How to Set Notes for Customer in Sage X3

There are many situations where user need to set up the important information or messages for specific customer in ERP. Now Sage X3 is also provide the provision of setting up the messages or notes for specific customer which will further reflect in to sales document.

Today in this blog we will discuss how user can setup the messages/notes for specific customer.

New Stuff: – Manual Remittance Entry in Sage X3

Navigate to below path to setup a notes in customer screen:

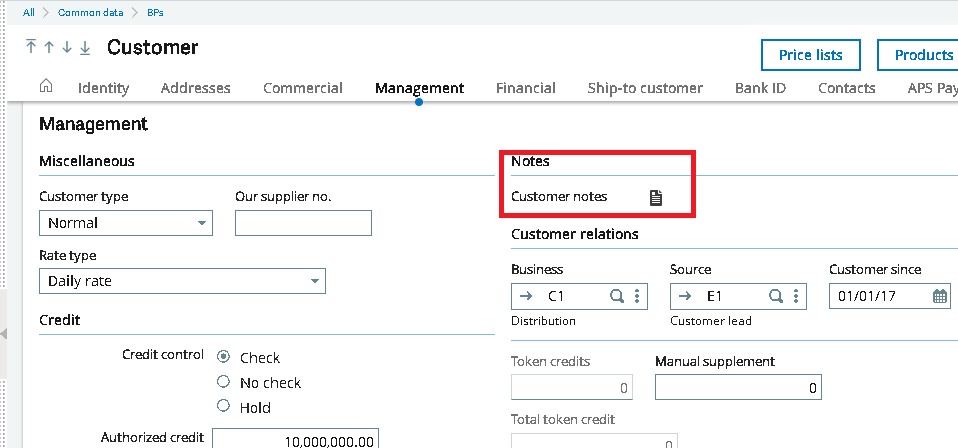
Common Data >> BP’s >> Customers >> management Tab. In the management tab you can see the notes section and Customer notes icon.

Customer-Screen-Notes

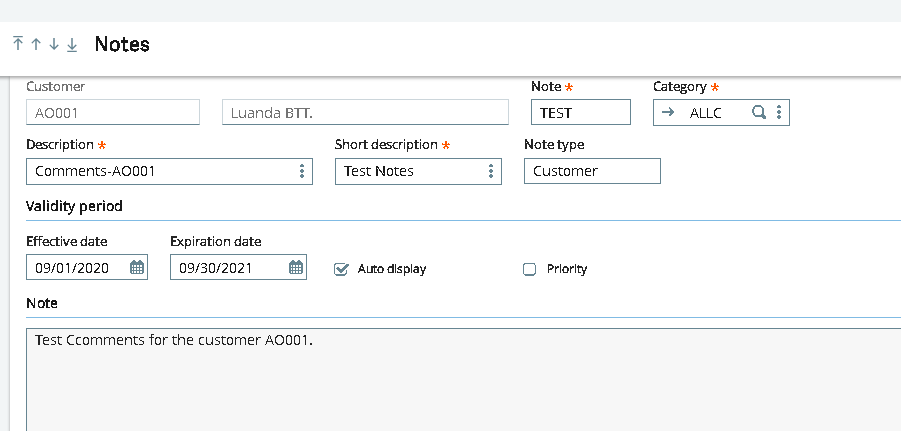
Once you click on Customer notes icon the system will redirect you to the Notes screen where you can mentioned all the details such as Description, Short description and Comment under the section of Notes. You can also set the start and end date i.e. Validity period of the particular notes.

Kindly check below screenshot for detail view.

Customer Notes Details

Basically this function can be accessed from the Products, Suppliers, Prospects and Customers management functions.

You can use the notes function to enter information related to the product, supplier, prospect or customer as a note. This information is displayed or inquired from the functions that have been selected at the Note category level.

User can create multiple notes for the same product, supplier, prospect, customer, and indicate if they must be displayed as a priority.

Let us see the use / function of all the fields present:

  • Note: – This is basically use to enter mentioned the Note code which will further use to identify the notes.
  • Category: – Use this function to set up and maintain note categories for products (including product-sites), customers, suppliers, prospects, or customer relations. When creating a note, this note is assigned a category that determines in which functions this note will be available. These functions may belong to the Purchasing, Sales, Customer relation and Production module
  • Description and Short description: – This is use to add the particular description. For both the field there is a Translation option is present form the Actions menu in order to open the Line Translation function.
  • Effective Date: – This field use to determine from which date the note can be access in the function selected in the category. By default it is the system date. If this field is blank, the note takes effect the same day it is created.
  • Expiration date: – This field use to determine till when this note will be available. By default, the expiry date corresponds to the default system date + 1 year. If this field is blank, the note does not expire.
  • Auto Display: – User can specify if the note must be displayed automatically by using the option Auto display. This option helps user to display the notes automatically during the data entry.
  • Priority: – This field is use to assign the note as a priority.

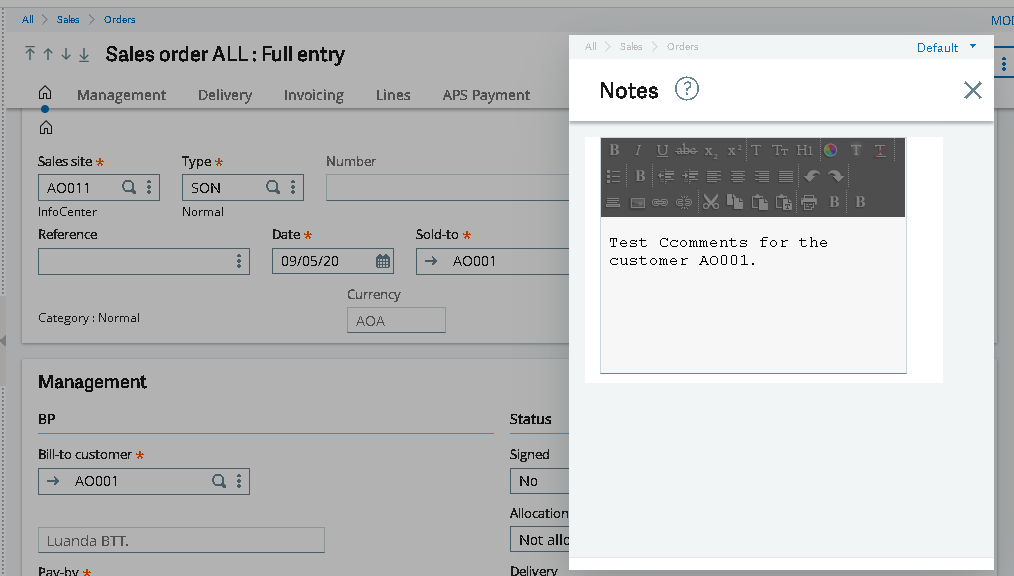
As per the mentioned above in the category section we have created this particular notes with category “ALLC” and we assigned all the modules for this category. So during further data entry if user wants to create the sales order then this created notes will be pop up once user enters the Customer in the sales order transaction. You see below screenshot for details.

Notes-on-sales-order

This is how user can setup the comments for specific customer in Sage X3. This will helps user to easily maintain the important notes / Message for customers. This feature is very user-friendly and it is introduced updated version of Sage X3 i.e.  in V12.

About Us

Greytrix – a globally recognized and one of the oldest Sage Development Partner is a one-stop solution provider for Sage ERP and Sage CRM organizational needs. Being acknowledged and rewarded for multi-man years of experience, we bring complete end-to-end assistance for your technical consultations, product customizations, data migration, system integrations, third-party add-on development and implementation competence.

Greytrix caters to a wide range of Sage X3, a Sage Business Cloud Solution, offerings. Our unique GUMU™ integrations include Sage X3 for Sage CRMSalesforce.com, Dynamics 365 CRM and Magento eCommerce along with Implementation and Technical Support worldwide for Sage X3. Currently we are Sage X3 Implementation Partner in East Africa, Middle East, Australia, Asia, US, UK. We also offer best-in-class Sage X3 customization and development services, integrated applications such as POS | WMS | Payment Gateway | Shipping System | Business Intelligence | eCommerce and have developed add-ons such as Catch – Weight  and Letter of Credit and India Legislation for Sage X3 to Sage business partners, end users and Sage PSG worldwide.

Greytrix is a recognized Sage champion ISV Partner for GUMU™ Sage X3 – Sage CRM integration also listed on Sage Marketplace; GUMU™ integration for Sage X3 – Salesforce is a 5-star rated app listed on Salesforce AppExchange and GUMU™ integration for Dynamics 365 CRM – Sage ERP listed on Microsoft AppSource.

For more information on Sage X3 Integration and Services, please contact us at x3@greytrix.com, We will like to hear from you.

This is how user can setup the comments for specific customer in Sage X3. This will helps user to easily maintain the important notes / Message for customers. This feature is very user-friendly and it is introduced updated version of Sage X3 i.e.  in V12.

Manual Remittance Entry in Sage X3

In this blog post, we will discuss how to create manual remittance entries in Sage X3. As we all know, in Sage X3, payments can be done against invoices that are generated from Purchase Invoice and Supplier BP invoice from the AP-AR accounting module. Payments transactions are created bank-wise as per the selected supplier/vendor. Payments are also done against multiple invoices and users can create the remittance entry against multiple payments. The purpose of Remittance entry is to provide the payment transactions to a particular bank in proper format with cash settlement, bill exchange issues, collections, check payments, discounts, etc.

By using manual remittance creation, users can create a group of payments manually which are linked to the same bank, same transaction, same site, and same company in a single remittance. They can also modify, delete, or update previously created entry but once it is posted they can’t do any amendments in the same.

Now let’s take an example, the user has to create the payment transactions against an invoice first,

To navigate, AP-AR Accounting–>Payments Section–>Payment/Receipt Entry.

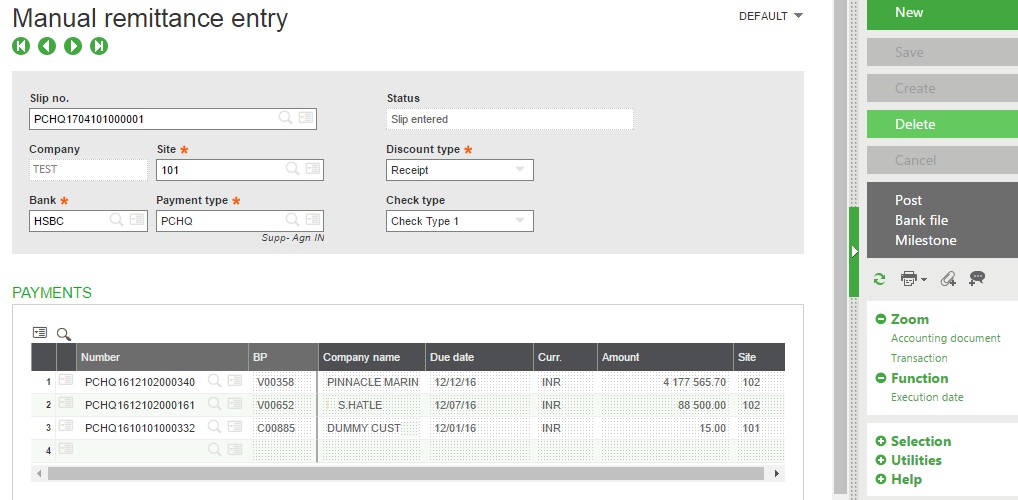
Create some payment transactions against the purchase invoices and then post those entries. Generated payment are PCHQ1612102000340, PCHQ1612102000161, PCHQ1610102000332, This payment can be done against purchase invoice or supplier BP invoice transactions.

Now we will create Manual remittance entry by navigating to AP-AR Accounting–>Remittances Section–>Manual Remittance Creation, refer below screenshot:-

New Stuff: How to enable select all check box in the left side panel in Sage X3

[Manual Remittance Entry]

[Manual Remittance Entry]

In above screen, first we have to select site, bank and then payment type (so that only particular payments will be selected as per the selected payment type)discount type, check type. After that select one or more than one payment entry to create the remittance entry in the bank and then deposit slip in particular bank. This all payments will be manually remitted in the bank which was selected at the header level.

The status will be shown in the status field as per the transaction whether it is posted or created. After the creation of remittance entry, the status will be “Slip Entered”, when a user clicks on Bank file button to create the electronic/EDI file then the status will be changed to “Slip-on file” and after posted the remittance entry, the status will be changed to “In the bank”.

Users can also click on the post button to post the remittance transaction in the bank. Based on the payment type, supplier, and bank details the system can provide a remittance on a transitional account or directly in the particular bank. This button is also used to validate remittance entry.

Bank File button is used if user transmission of a deposit planned in the payment transactions with the bank at its target. By clicking on this button, an electronic file or EDI file will be sent in a specific format.

In this way by using the manual remittance creation screen, the user can create the remittance transaction with the group of payments to the bank for a company through a single remittance entry.

About Us

Greytrix – a globally recognized and one of the oldest Sage Development Partner is a one-stop solution provider for Sage ERP and Sage CRM organizational needs. Being acknowledged and rewarded for multi-man years of experience, we bring complete end-to-end assistance for your technical consultations, product customizations, data migration, system integrations, third-party add-on development and implementation competence.

Greytrix caters to a wide range of Sage X3, a Sage Business Cloud Solution, offerings. Our unique GUMU™ integrations include Sage X3 for Sage CRMSalesforce.com, Dynamics 365 CRM and Magento eCommerce along with Implementation and Technical Support worldwide for Sage X3. Currently we are Sage X3 Implementation Partner in East Africa, Middle East, Australia, Asia, US, UK. We also offer best-in-class Sage X3 customization and development services, integrated applications such as POS | WMS | Payment Gateway | Shipping System | Business Intelligence | eCommerce and have developed add-ons such as Catch – Weight  and Letter of Credit and India Legislation for Sage X3 to Sage business partners, end users and Sage PSG worldwide.

Greytrix is a recognized Sage champion ISV Partner for GUMU™ Sage X3 – Sage CRM integration also listed on Sage Marketplace; GUMU™ integration for Sage X3 – Salesforce is a 5-star rated app listed on Salesforce AppExchange and GUMU™ integration for Dynamics 365 CRM – Sage ERP listed on Microsoft AppSource.

For more information on Sage X3 Integration and Services, please contact us at x3@greytrix.com, We will like to hear from you.