What is a Server?
A server is a powerful computer connected to a network (typically the Internet) and provides access to some resources or services.
There are many types of servers. For example:
- Web Server: This is the most common type of server. It hosts a website that is typically accessible over the Internet. This website can also be private, in which case, it is an intranet.
- File Server: Store a lot of files that are accessible over a network. For example, it can be a local media center that enables your family to watch personal videos on all your home devices (television, computer, or smartphone).
- Game Server: Used to run the server application of a specific game, like Minecraft.
- Peripheral Server: Gives access to equipment such as printers.
There are also many specialized servers that are only used by IT professionals and tech-savvy individuals.
When Should You Consider Buying Your Own Server?
Nowadays, it is quite rare to need to own a server, but there are a few scenarios where that is a viable option.
If you plan to buy your own server, you will need some IT skills, and, just like any computer, you will need to cover its acquisition cost, handle its maintenance (fixing hardware failures) and pay for its electricity and network consumption.

Privacy
You may want to keep your personal data physically in your home. Usually, you would store it on your computer or some USB drives. Still, if you want to access it from multiple devices, it is better to set up a file server that can even come with some features that minimize the chances of losing your data due to hardware failure.
Similarly, a company will sometimes have sensitive data that they want to keep inside their offices. In this case, they can set up an intranet that is only accessible from their local network.
However, thanks to encryption and VPNs, it is typically possible to keep your data private while hosting it on the Internet.
Proximity
If you or your company work with a large amount of data or live in an area with a poor Internet connection, it might be more productive to store your data locally. The speed and latency of a local network will always be much better than any Internet-based solution.
Customization and Cost
There are some special scenarios where you would need a server configured in a way that is not readily available to rent. For example, you may need a managed dedicated server with a specific peripheral or hardware acceleration component. More generally, you will have the freedom to choose exactly the hardware configuration that fits your needs.
Even if you decide to buy your own servers, you won’t have to build a data center around them. Instead, you can lease some space at a colocation center and place your servers there. Leasing space will save you from having to handle issues like redundant power, networking, cooling, and physical security. It is up to the business to decide whether an unmanaged dedicated server is the right option for you.
Key Takeaway: Consider privacy, proximity, customization requirements, and cost when considering purchasing your own server.
What is Server Leasing?
Leasing servers provides a cost-effective option that can meet the needs of many organizations that are seeking the best return on investment. When leasing a server, the lessee agrees to a term and price to lease a server from the owner or lessor. This agreement often can include management of the server itself and provides several benefits not found when purchasing a server.
For example, when leasing a server, there is often no substantial upfront payment as there would be when purchasing a server outright. Once the lease is over, the lessee can choose to move on or migrate to a newer, better server without the burden of getting rid of old equipment. Additionally, many lease arrangements include the owner providing maintenance and management of the server as a way to protect their asset. All in all, leasing a server reduces upfront costs and much of the IT burden of owning a server.
On the flip side, there are a few disadvantages to leasing a server. When the lease expires, the lessee is left without an asset for the money they’ve spent. The owner is still the owner, and, presuming the lessee still needs a server, they will have to either renew the lease or find another option. Additionally, while leasing does not usually include an upfront payment, the overall price over time has the potential to be greater than if the server had been purchased outright.
Some leases allow the lessor to purchase the server at the end of the term, much like leasing an automobile. While this can make a lot of sense from a continuity of service perspective, technology has likely advanced enough for a new server to be a better option. Additionally, purchasing the server at the end of the lease would shift the management and maintenance burden back to the lessor.
Make sure to research the lease terms prior to signing any contract. Otherwise, you may find that it is very costly to cancel a lease mid-term, even if your technical needs change or your business evolves.
Key Takeaway: Consider business growth, overall cost, and your team’s technical expertise when considering whether leasing a server is the right option.
Renting
One option worth considering that has grown in popularity in recent years is simply renting server space. Renting a server means that management and support are typically included for the renter and, even better, the renter doesn’t have to worry about things like hardware refresh cycles and datacenter management, issues that both lessors and buyers do have to consider.
For a minimal upfront cost, it is possible to rent powerful servers that will be available to you within minutes. There is a large range of options, including dedicated vs. vps hosting, available to you.
You can upgrade or downgrade these servers with just a few clicks. This enables you to adapt as your needs change. If you ever decide to shut down these servers, you don’t have to deal with disposing of them.
You don’t have to worry about hardware maintenance or nor security issues. And in some cases, even the software can be maintained and managed for you.
Key Takeaway: Consider data center management and hardware lifecycles when determining whether to rent your next server.
Let the Experts at Liquid Web Help
At Liquid Web, we’ve spent two decades helping businesses and technology professionals find the server solutions that are right for them. It isn’t just about RAM and storage. It’s also about the terms and commitment that fit best for your specific needs. Our team is ready to help find the right solution for you. Contact us today to learn more about how Liquid Web can help.

The post What is Server Leasing? appeared first on Liquid Web.


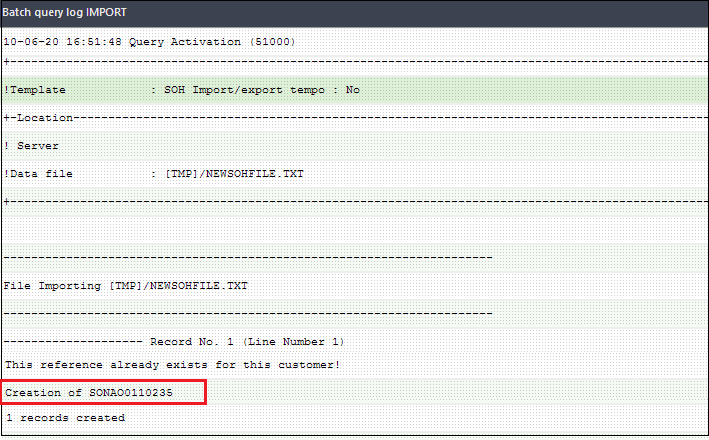
 integrations include
 ![[Sample Sales Invoice]](https://www.greytrix.com/blogs/sagex3/wp-content/uploads/2020/10/Sample-Sales-Invoice.png)
![[Warning message on credit note]](https://www.greytrix.com/blogs/sagex3/wp-content/uploads/2020/10/Warning-message.png)