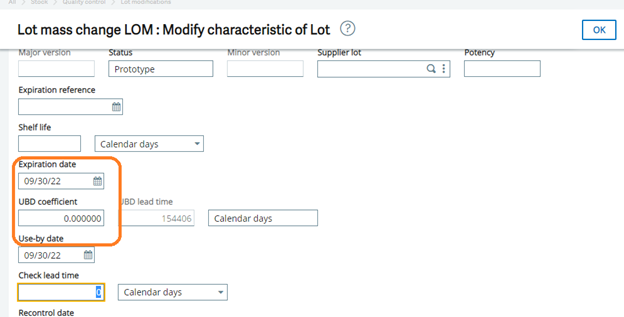
How to change the LOT’s expiration date (for multiple sites) in Sage X3

In some business scenario customer wants to change the expiry date when product exist in multiple sites, of the existing Lot numbers of its existing stock, and they were hunting for a solution which could help them with this.

A lot number is an identification number assigned to a particular quantity or lot of material from a single manufacturer. Lot numbers can typically be found on the outside of packaging. For cars, a lot number is combined with a serial number to form the vehicle Identification Number.

The lot number enables tracing of the constituent parts or ingredients as well as labour and equipment records involved in the manufacturing of a product. This enables manufacturers and other entities to perform Quality control checks, calculate expiry date and issue corrections or recall  information to subsets of their production output. It also gives consumers an identifier that they can use in contacting the manufacturer and researching the production of goods received. For example, to trace back the origin of fish or meat, in case of a public health problem.
The expiry date is associated with a lot in stock. It indicates a usage end date for the stock of a product and is controlled in the issue movements. In Sage X3, there is a standard functionality, with the help of this user can modify the LOT’s expiration date for multiple sites.

Follow the below steps to modify or change the LOT’s expiration date:

Steps:

For example, we have FIN501 product at two different sites which has LOT expiration date is 08/09/20, as shown in below figure.
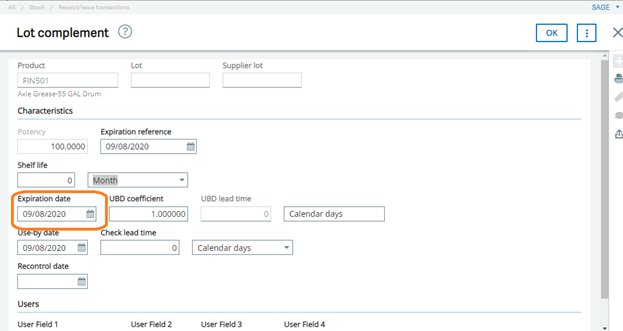
Fig: LOT complement
Fig : Stock by lot

Now we will modify the existing Product LOT expiry date with the help of below screen.

Navigate To: Stock > Lot modification > Lot mass change

  1. Select the All sites check box when the lot number is existing at multiple sites for respective product.
  2. Enter product
  3. Enter LOT number
  4. Enter the LOT expiration date
  5. Click on OK.

Please refer the below figures for the same,
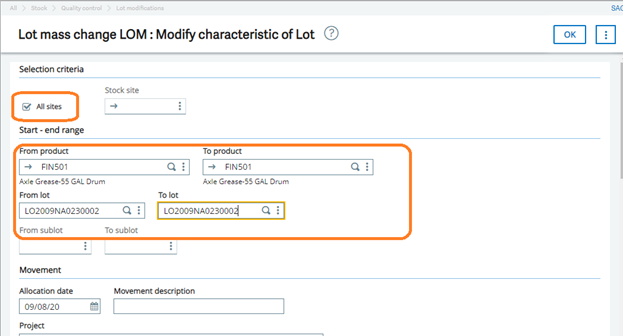
Fig: Lot mass change
Fig : Lot mass change

After clicking on OK button, it will display one screen to verify the entry.

Now after saving the entry it will show one pop up message Entry validation select as a Yes, as shown in below figure.
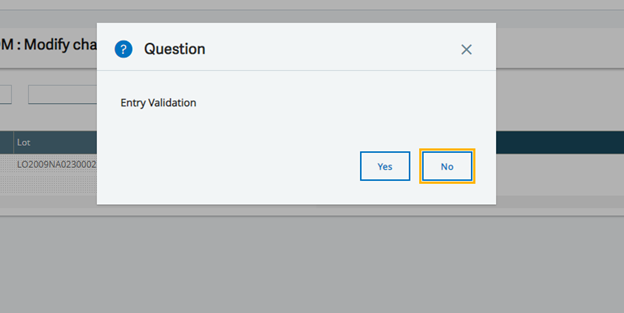
Fig : Entry validation

After this process log file will be generated with the modified data, as shown in below figure.
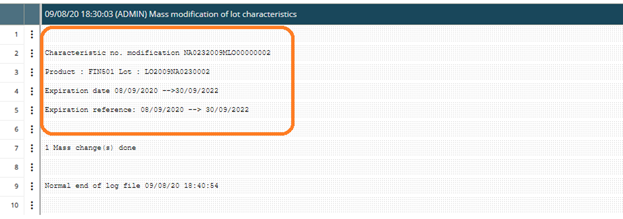
Fig: Log file

Now the Lot expiration date has successfully modified. You can check the modified expiration date with the help of stock inquiry screen i.e. Stock by lot screen.

Navigate To: Stock > Inquires > Stock by lots

1. Enter a product and click on search button

2. It will show the multiple no. of LOT number, you can check the respective Lot number expiry date, as shown in below figure.

Fig: Stock by lot

With the help of above steps user can modify or edit the LOT expiration date for multiple sites.

About Us

Greytrix – a globally recognized and one of the oldest Sage Development Partner is a one-stop solution provider for Sage ERP and Sage CRM organizational needs. Being acknowledged and rewarded for multi-man years of experience, we bring complete end-to-end assistance for your technical consultations, product customizations, data migration, system integrations, third-party add-on development and implementation competence.

Greytrix caters to a wide range of Sage X3, a Sage Business Cloud Solution, offerings. Our unique GUMU™ integrations include Sage X3 for Sage CRMSalesforce.com, Dynamics 365 CRM and Magento eCommerce along with Implementation and Technical Support worldwide for Sage X3. Currently we are Sage X3 Implementation Partner in East Africa, Middle East, Australia, Asia, US, UK. We also offer best-in-class Sage X3 customization and development services, integrated applications such as POS | WMS | Payment Gateway | Shipping System | Business Intelligence | eCommerce and have developed add-ons such as Catch – Weight  and Letter of Credit and India Legislation for Sage X3 to Sage business partners, end users and Sage PSG worldwide.

Greytrix is a recognized Sage champion ISV Partner for GUMU™ Sage X3 – Sage CRM integration also listed on Sage Marketplace; GUMU™ integration for Sage X3 – Salesforce is a 5-star rated app listed on Salesforce AppExchange and GUMU™ integration for Dynamics 365 CRM – Sage ERP listed on Microsoft AppSource.

For more information on Sage X3 Integration and Services, please contact us at x3@greytrix.com, We will like to hear from you.

How to enable serial number field in sales invoice screen in Sage X3

A sales invoice is an accounting document that records a business transaction. Sales invoices provide the business with a record of the services they’ve provided to a client, when the services were rendered and how much money the client owes the business. Typically, a sales invoice will include a description of the service provided, the amount owed and the deadline for payment.  A sales invoice is created by the business after they’ve provided products or services to a client, as a way to request payment.

We may need a basic important points to make a sales invoice such as:

  1. Customer Details
  2. Payment Terms.
  3. Payment Due Date.

Payment Terms: Its is a condition under which a seller will complete a sales . Typically, these terms may demand cash in advance, cash on delivery. Also the payment terms on your sales invoice, including the payment methods you accept (i.e. cash, cheque, credit card, debit card, visa etc.).

Payment Due Date: It is the date when payment should be received by the company. Also it clearly list the deadline for payment on your sales invoice. Eg(Payment due in 30 Days etc etc.).

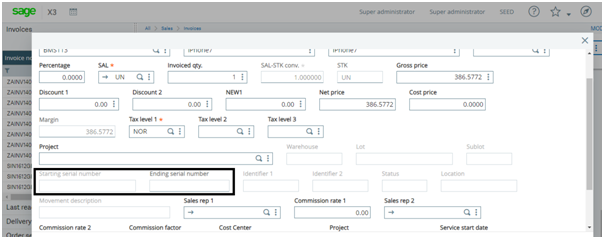
Now sometimes in Sage X3, we may find difficulties in entering the serial number manually in sales invoice screen as this field is always seen disabled in the screen. So, for solving these Sage X3 has a some in build functionality. Kindly follow below steps for enabling the serial number field in Sales Invoice screen.

Navigate to: Sales -> Invoices -> Invoices

Fig: Sales Invoice screen

As we can see in above screen shot, serial number field is disable. Now follow below steps to enable this field.

Step1:

  1. Open Sales Invoice  screen.
  2. Click on new button.
  3. Enter site, customer
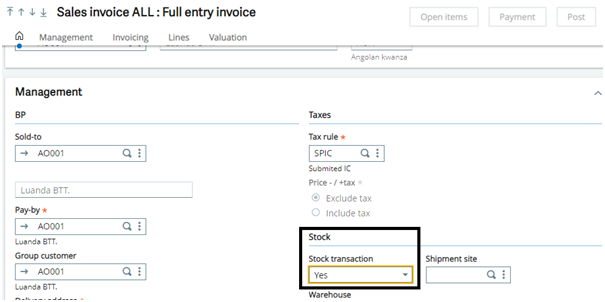
  4. Set stock transaction field as ‘Yes’. Refer below screen shot:

Navigate to : Sales -> Invoices -> Invoices -> Management tab

Fig: Stock Transaction field

By doing above steps , serial number field will get enabled in the lines grid.

Now follow below steps to display data in serial number filed in lines grid.

Step1:

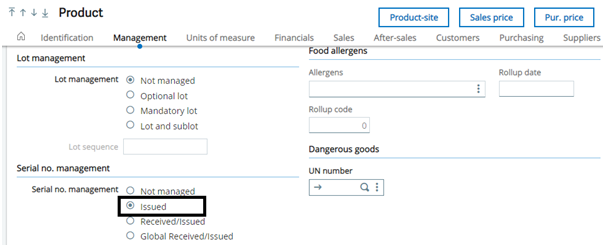
  1. Create new product or select product whose serial number management is set as ‘Issued’.

Navigate to: Common Data -> Products -> Products -> Management tab

Fig: Product Screen
  1. Now create sales invoice.
  2. Set stock transaction field as ‘Yes’.
  3. Enter product in lines grid.
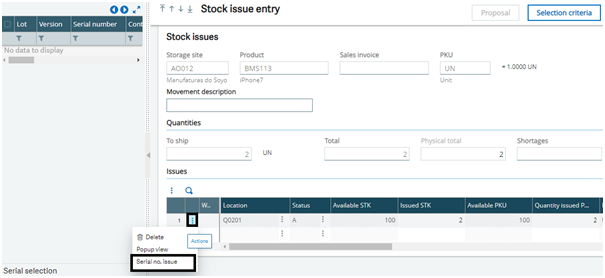
  4. After entering quantity, new screen is getting open name as ‘Stock issue entry’.
  5. Now go to action button and select ‘serial number issue’ button from the lines grid. Refer below screen shot of the same:
Fig: Stock Issue Entry screen
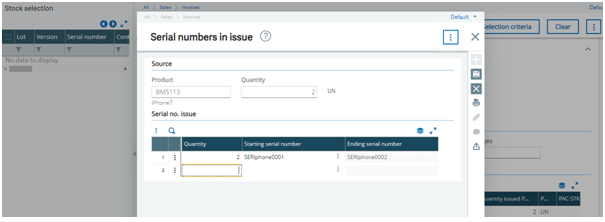
  1. After this, new screen getting opened named as ‘Serial Numbers in issue’.
  2. Enter quantity to issue.
  3. Enter ‘Starting Serial number’.
  4. Click on Save button.
Fig: Serial numbers in issue screen

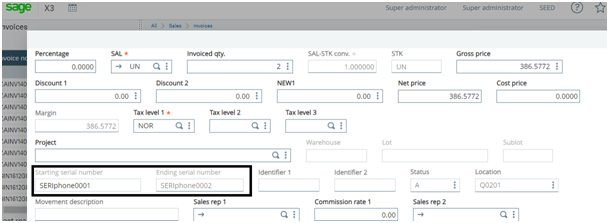
Now check serial number field data is visible in lines grid.

Fig: Serial Number Field

By doing all the above steps, the field will get enabled and data will get populated on the field.

About Us

Greytrix – a globally recognized and one of the oldest Sage Development Partner is a one-stop solution provider for Sage ERP and Sage CRM organizational needs. Being acknowledged and rewarded for multi-man years of experience, we bring complete end-to-end assistance for your technical consultations, product customizations, data migration, system integrations, third-party add-on development and implementation competence.

Greytrix caters to a wide range of Sage X3, a Sage Business Cloud Solution, offerings. Our unique GUMU™ integrations include Sage X3 for Sage CRMSalesforce.com, Dynamics 365 CRM and Magento eCommerce along with Implementation and Technical Support worldwide for Sage X3. Currently we are Sage X3 Implementation Partner in East Africa, Middle East, Australia, Asia, US, UK. We also offer best-in-class Sage X3 customization and development services, integrated applications such as POS | WMS | Payment Gateway | Shipping System | Business Intelligence | eCommerce and have developed add-ons such as Catch – Weight  and Letter of Credit and India Legislation for Sage X3 to Sage business partners, end users and Sage PSG worldwide.

Greytrix is a recognized Sage champion ISV Partner for GUMU™ Sage X3 – Sage CRM integration also listed on Sage Marketplace; GUMU™ integration for Sage X3 – Salesforce is a 5-star rated app listed on Salesforce AppExchange and GUMU™ integration for Dynamics 365 CRM – Sage ERP listed on Microsoft AppSource.

For more information on Sage X3 Integration and Services, please contact us at x3@greytrix.com, We will like to hear from you.
How to Set Notes for Customer in Sage X3

There are many situations where user need to set up the important information or messages for specific customer in ERP. Now Sage X3 is also provide the provision of setting up the messages or notes for specific customer which will further reflect in to sales document.

Today in this blog we will discuss how user can setup the messages/notes for specific customer.

New Stuff: – Manual Remittance Entry in Sage X3

Navigate to below path to setup a notes in customer screen:

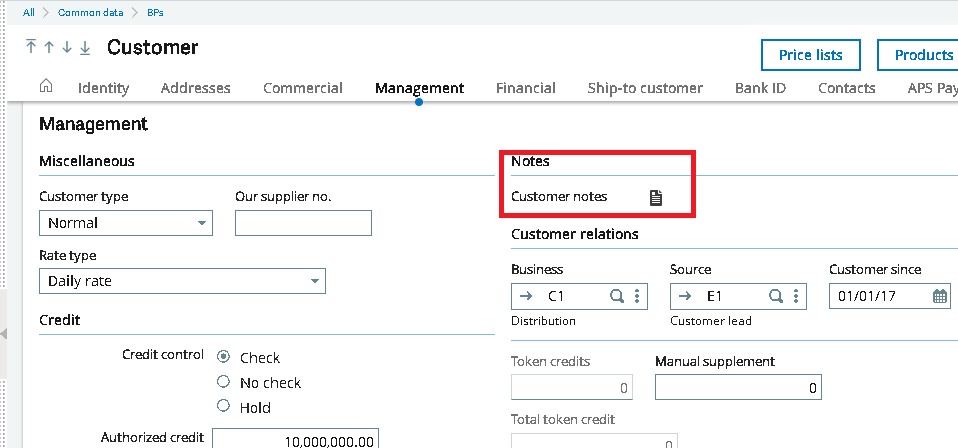
Common Data >> BP’s >> Customers >> management Tab. In the management tab you can see the notes section and Customer notes icon.

Customer-Screen-Notes

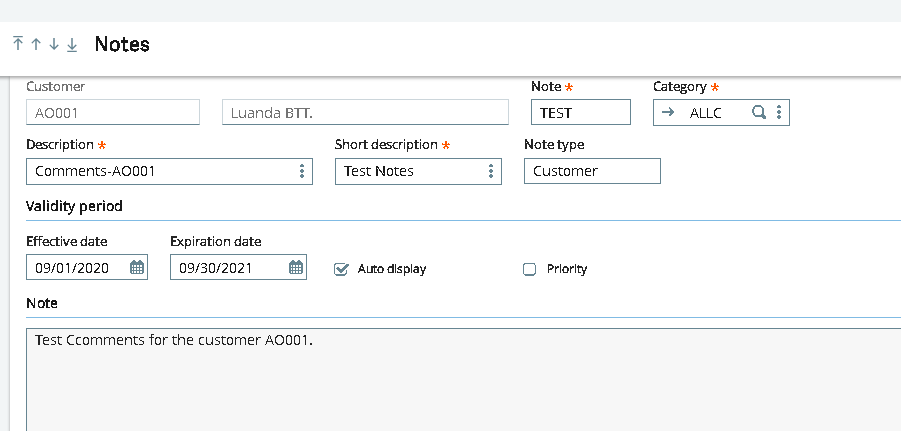
Once you click on Customer notes icon the system will redirect you to the Notes screen where you can mentioned all the details such as Description, Short description and Comment under the section of Notes. You can also set the start and end date i.e. Validity period of the particular notes.

Kindly check below screenshot for detail view.

Customer Notes Details

Basically this function can be accessed from the Products, Suppliers, Prospects and Customers management functions.

You can use the notes function to enter information related to the product, supplier, prospect or customer as a note. This information is displayed or inquired from the functions that have been selected at the Note category level.

User can create multiple notes for the same product, supplier, prospect, customer, and indicate if they must be displayed as a priority.

Let us see the use / function of all the fields present:

  • Note: – This is basically use to enter mentioned the Note code which will further use to identify the notes.
  • Category: – Use this function to set up and maintain note categories for products (including product-sites), customers, suppliers, prospects, or customer relations. When creating a note, this note is assigned a category that determines in which functions this note will be available. These functions may belong to the Purchasing, Sales, Customer relation and Production module
  • Description and Short description: – This is use to add the particular description. For both the field there is a Translation option is present form the Actions menu in order to open the Line Translation function.
  • Effective Date: – This field use to determine from which date the note can be access in the function selected in the category. By default it is the system date. If this field is blank, the note takes effect the same day it is created.
  • Expiration date: – This field use to determine till when this note will be available. By default, the expiry date corresponds to the default system date + 1 year. If this field is blank, the note does not expire.
  • Auto Display: – User can specify if the note must be displayed automatically by using the option Auto display. This option helps user to display the notes automatically during the data entry.
  • Priority: – This field is use to assign the note as a priority.

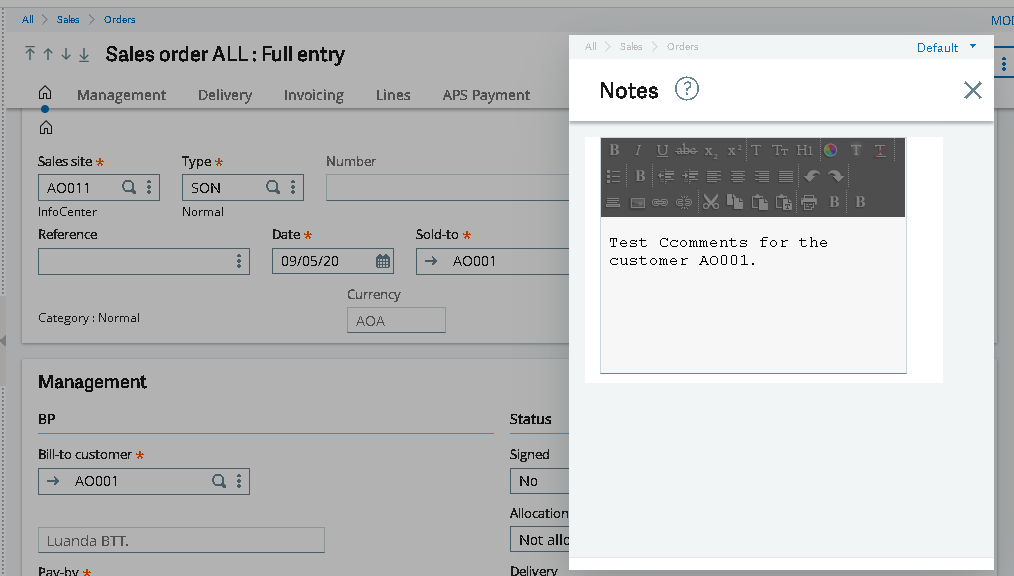
As per the mentioned above in the category section we have created this particular notes with category “ALLC” and we assigned all the modules for this category. So during further data entry if user wants to create the sales order then this created notes will be pop up once user enters the Customer in the sales order transaction. You see below screenshot for details.

Notes-on-sales-order

This is how user can setup the comments for specific customer in Sage X3. This will helps user to easily maintain the important notes / Message for customers. This feature is very user-friendly and it is introduced updated version of Sage X3 i.e.  in V12.

About Us

Greytrix – a globally recognized and one of the oldest Sage Development Partner is a one-stop solution provider for Sage ERP and Sage CRM organizational needs. Being acknowledged and rewarded for multi-man years of experience, we bring complete end-to-end assistance for your technical consultations, product customizations, data migration, system integrations, third-party add-on development and implementation competence.

Greytrix caters to a wide range of Sage X3, a Sage Business Cloud Solution, offerings. Our unique GUMU™ integrations include Sage X3 for Sage CRMSalesforce.com, Dynamics 365 CRM and Magento eCommerce along with Implementation and Technical Support worldwide for Sage X3. Currently we are Sage X3 Implementation Partner in East Africa, Middle East, Australia, Asia, US, UK. We also offer best-in-class Sage X3 customization and development services, integrated applications such as POS | WMS | Payment Gateway | Shipping System | Business Intelligence | eCommerce and have developed add-ons such as Catch – Weight  and Letter of Credit and India Legislation for Sage X3 to Sage business partners, end users and Sage PSG worldwide.

Greytrix is a recognized Sage champion ISV Partner for GUMU™ Sage X3 – Sage CRM integration also listed on Sage Marketplace; GUMU™ integration for Sage X3 – Salesforce is a 5-star rated app listed on Salesforce AppExchange and GUMU™ integration for Dynamics 365 CRM – Sage ERP listed on Microsoft AppSource.

For more information on Sage X3 Integration and Services, please contact us at x3@greytrix.com, We will like to hear from you.
This is how user can setup the comments for specific customer in Sage X3. This will helps user to easily maintain the important notes / Message for customers. This feature is very user-friendly and it is introduced updated version of Sage X3 i.e.  in V12.

Manual Remittance Entry in Sage X3

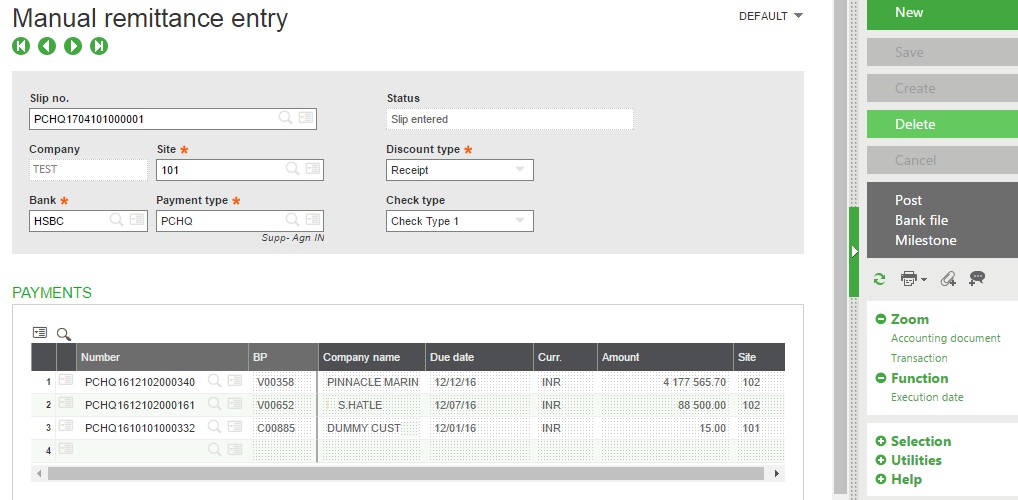
In this blog post, we will discuss how to create manual remittance entries in Sage X3. As we all know, in Sage X3, payments can be done against invoices that are generated from Purchase Invoice and Supplier BP invoice from the AP-AR accounting module. Payments transactions are created bank-wise as per the selected supplier/vendor. Payments are also done against multiple invoices and users can create the remittance entry against multiple payments. The purpose of Remittance entry is to provide the payment transactions to a particular bank in proper format with cash settlement, bill exchange issues, collections, check payments, discounts, etc.

By using manual remittance creation, users can create a group of payments manually which are linked to the same bank, same transaction, same site, and same company in a single remittance. They can also modify, delete, or update previously created entry but once it is posted they can’t do any amendments in the same.

Now let’s take an example, the user has to create the payment transactions against an invoice first,

To navigate, AP-AR Accounting–>Payments Section–>Payment/Receipt Entry.

Create some payment transactions against the purchase invoices and then post those entries. Generated payment are PCHQ1612102000340, PCHQ1612102000161, PCHQ1610102000332, This payment can be done against purchase invoice or supplier BP invoice transactions.

Now we will create Manual remittance entry by navigating to AP-AR Accounting–>Remittances Section–>Manual Remittance Creation, refer below screenshot:-

New Stuff: How to enable select all check box in the left side panel in Sage X3

[Manual Remittance Entry]

[Manual Remittance Entry]

In above screen, first we have to select site, bank and then payment type (so that only particular payments will be selected as per the selected payment type)discount type, check type. After that select one or more than one payment entry to create the remittance entry in the bank and then deposit slip in particular bank. This all payments will be manually remitted in the bank which was selected at the header level.

The status will be shown in the status field as per the transaction whether it is posted or created. After the creation of remittance entry, the status will be “Slip Entered”, when a user clicks on Bank file button to create the electronic/EDI file then the status will be changed to “Slip-on file” and after posted the remittance entry, the status will be changed to “In the bank”.

Users can also click on the post button to post the remittance transaction in the bank. Based on the payment type, supplier, and bank details the system can provide a remittance on a transitional account or directly in the particular bank. This button is also used to validate remittance entry.

Bank File button is used if user transmission of a deposit planned in the payment transactions with the bank at its target. By clicking on this button, an electronic file or EDI file will be sent in a specific format.

In this way by using the manual remittance creation screen, the user can create the remittance transaction with the group of payments to the bank for a company through a single remittance entry.

About Us

Greytrix – a globally recognized and one of the oldest Sage Development Partner is a one-stop solution provider for Sage ERP and Sage CRM organizational needs. Being acknowledged and rewarded for multi-man years of experience, we bring complete end-to-end assistance for your technical consultations, product customizations, data migration, system integrations, third-party add-on development and implementation competence.

Greytrix caters to a wide range of Sage X3, a Sage Business Cloud Solution, offerings. Our unique GUMU™ integrations include Sage X3 for Sage CRMSalesforce.com, Dynamics 365 CRM and Magento eCommerce along with Implementation and Technical Support worldwide for Sage X3. Currently we are Sage X3 Implementation Partner in East Africa, Middle East, Australia, Asia, US, UK. We also offer best-in-class Sage X3 customization and development services, integrated applications such as POS | WMS | Payment Gateway | Shipping System | Business Intelligence | eCommerce and have developed add-ons such as Catch – Weight  and Letter of Credit and India Legislation for Sage X3 to Sage business partners, end users and Sage PSG worldwide.

Greytrix is a recognized Sage champion ISV Partner for GUMU™ Sage X3 – Sage CRM integration also listed on Sage Marketplace; GUMU™ integration for Sage X3 – Salesforce is a 5-star rated app listed on Salesforce AppExchange and GUMU™ integration for Dynamics 365 CRM – Sage ERP listed on Microsoft AppSource.

For more information on Sage X3 Integration and Services, please contact us at x3@greytrix.com, We will like to hear from you.
How to enable select all check box in the left side panel in Sage X3

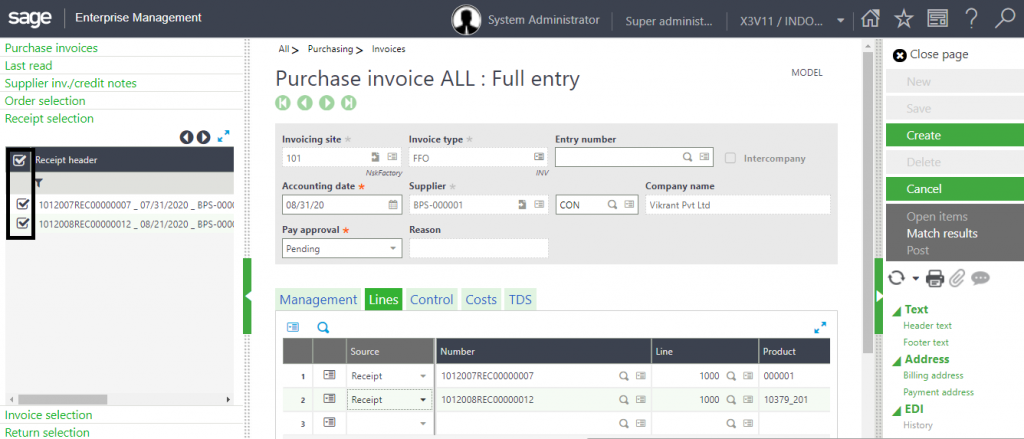
As we all know, in Sage X3 when users want to create Purchase invoice against purchase receipt, he/she has to select receipt from the left list one by one. Recently one of our client wanted to have an option to select all Receipts in a single click from the left side panel while creating purchase invoice against a particular vendor.

New Stuff: How to exclude header part on the last page on Purchase Order

Purchase Invoice Screen

Purchase Invoice Screen

Previously user has to select receipt one by one which is very time consuming in case of 100 Receipts . So, we did modified invoice object PIH to have a check box in the left side panel of Purchase Invoice screen besides Receipt header as shown in the above screenshot which will select all the available Receipts in a single click.

Refer below steps that need to follow:

Step1 : Go to Development -> Select ‘PIH’ object.

Step2 : In General tab -> Management tab and then select management type as “ Simple selection “.

Step3 : Do validation of the object ‘PIH’ and also do global validation of that ‘OPIH’.

So using standard option available at object level, we did provided solution to our customer for selection all receipts on left panel.

How to exclude header part on the last page on Purchase Order Report

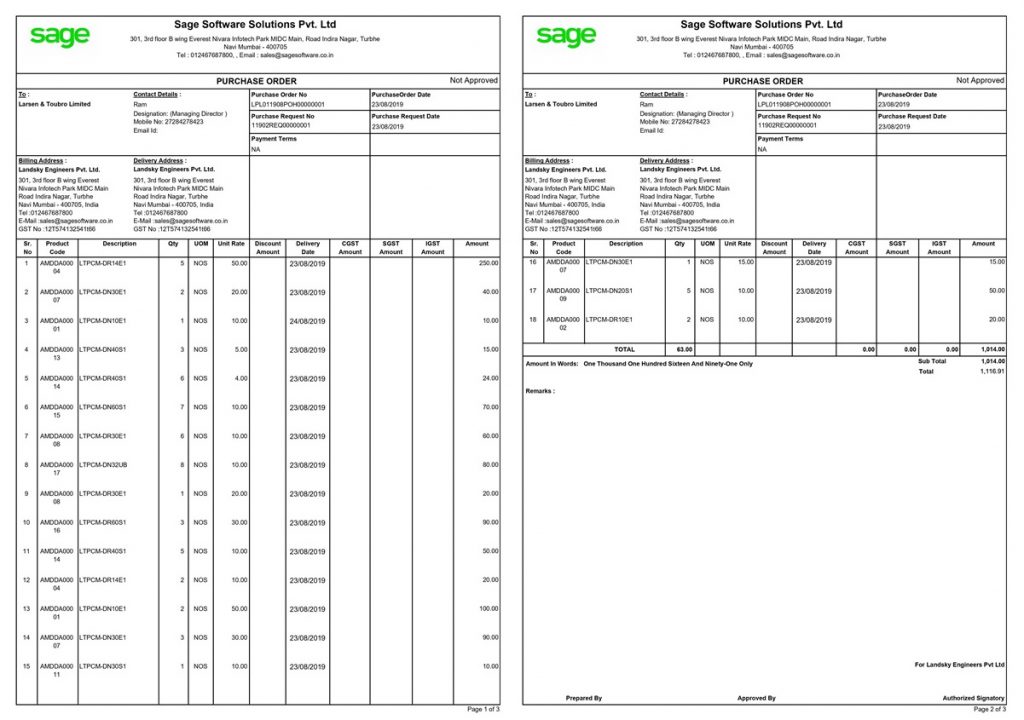
Sage X3 reports are developed in Crystal reports and can be modified as per user needs if you have required Crystal version installed on developer system. One of our client has requested to add ‘Terms and conditions’ on last page of the Purchase Order report. This was one of the easy task to add on the crystal for any developer but here we had one challenge to hide company Name & address for last page which was placed on the Page header and was printing on each page. So we come up with the solution and thought of sharing information with everyone.

This blog can be helpful when user wants to add summary or terms & conditions on the last page of the report and doesn’t want to include the page header details (company name, address, logo, contact details etc.) on last page.

To achieve this working in crystal report please refer the below steps:

Step 1:- Click on “Report” menu and select “Section Expert”.

New Stuff: Change the Date Format using 4GL

Report Menu

Report Menu

Step 2:- Select “Page Header” section from Sections.

Section Expert

Section Expert

Step 3:- Click on the icon at the right side of “Suppress(No Drill-Down)” and enter below formula in “Formula Workshop”

PageNumber = TotalPageCount

Formula Workshop

Formula Workshop

Step 4:- Click on “Save and close” to save changes.

Step 5:- Click on “OK” to save changes.

Output:-

Output-Fig. 1

Output-Fig. 1

Output-Fig. 2

Output-Fig. 2

In this way we can exclude the page header from last page of any report.

About Us

Greytrix – a globally recognized and one of the oldest Sage Development Partner is a one-stop solution provider for Sage ERP and Sage CRM organizational needs. Being acknowledged and rewarded for multi-man years of experience, we bring complete end-to-end assistance for your technical consultations, product customizations, data migration, system integrations, third-party add-on development and implementation competence.

Greytrix caters to a wide range of Sage X3, a Sage Business Cloud Solution, offerings. Our unique GUMU™ integrations include Sage X3 for Sage CRMSalesforce.com, Dynamics 365 CRM and Magento eCommerce along with Implementation and Technical Support worldwide for Sage X3. Currently we are Sage X3 Implementation Partner in East Africa, Middle East, Australia, Asia, US, UK. We also offer best-in-class Sage X3 customization and development services, integrated applications such as POS | WMS | Payment Gateway | Shipping System | Business Intelligence | eCommerce and have developed add-ons such as Catch – Weight  and Letter of Credit and India Legislation for Sage X3 to Sage business partners, end users and Sage PSG worldwide.

Greytrix is a recognized Sage champion ISV Partner for GUMU™ Sage X3 – Sage CRM integration also listed on Sage Marketplace; GUMU™ integration for Sage X3 – Salesforce is a 5-star rated app listed on Salesforce AppExchange and GUMU™ integration for Dynamics 365 CRM – Sage ERP listed on Microsoft AppSource.

For more information on Sage X3 Integration and Services, please contact us at x3@greytrix.com, We will like to hear from you.
Change the Date Format using 4GL Script

As we know, Sage X3 supports multiple date formats as per the users requirement. The default date format in Sage X3 is setup in setup–> Parameters. For the developers who wants to manipulate date field value, can use date functions in 4GL. Also there is inbuilt string function which can be useful for the developers to manipulate date using 4GL.

In this blog, we will see how we can manipulate date format using “format$”string function.

New Stuff: User Restrictions on Purchase Inquiry Screen

Syntax for date format

Syntax for date format

Syntax: format$(“format required”,”Date value”)

Let’s consider an example, format$(“YYYY[-]MM[-]DD”,date$) , Here we considered.

“YYYY-MM-DD” format and “date$” function gives us current date and we change the current date format of system to required format in our code.

In the above format square brackets i.e. “[ ]”are used to represent the constant value or spaces between date characters. The given date format is stored as a string in the system.

Output

Output

Below are some examples of the date formats with output which helps you to change the date format in 4GL script.

Examples of the date formats

Examples of the date formats

So by using Format$string function 4GL scripts, developers can change the date format according to users requirement& also can used in 4GL.

About Us

Greytrix – a globally recognized and one of the oldest Sage Development Partner is a one-stop solution provider for Sage ERP and Sage CRM organizational needs. Being acknowledged and rewarded for multi-man years of experience, we bring complete end-to-end assistance for your technical consultations, product customizations, data migration, system integrations, third-party add-on development and implementation competence.

Greytrix caters to a wide range of Sage X3, a Sage Business Cloud Solution, offerings. Our unique GUMU™ integrations include Sage X3 for Sage CRMSalesforce.com, Dynamics 365 CRM and Magento eCommerce along with Implementation and Technical Support worldwide for Sage X3. Currently we are Sage X3 Implementation Partner in East Africa, Middle East, Australia, Asia, US, UK. We also offer best-in-class Sage X3 customization and development services, integrated applications such as POS | WMS | Payment Gateway | Shipping System | Business Intelligence | eCommerce and have developed add-ons such as Catch – Weight  and Letter of Credit and India Legislation for Sage X3 to Sage business partners, end users and Sage PSG worldwide.

Greytrix is a recognized Sage champion ISV Partner for GUMU™ Sage X3 – Sage CRM integration also listed on Sage Marketplace; GUMU™ integration for Sage X3 – Salesforce is a 5-star rated app listed on Salesforce AppExchange and GUMU™ integration for Dynamics 365 CRM – Sage ERP listed on Microsoft AppSource.

For more information on Sage X3 Integration and Services, please contact us at x3@greytrix.com, We will like to hear from you.
User Restrictions on Purchase Inquiry Screen

In Sage X3, Users can check all the purchase related data using inquiry screens. But there is one drawback of this functionality that any user can check the data of all the other users also using inquiry screens. To overcome from this drawback, we did customization on Purchase Inquiry screens. By doing which users can check only those POs and GRNs in Inquiry screen which have been created by them. Users will be restricted to fetch other user’s data.

But there can be some users in the system who needs to see all the user’s data.

For this purpose, we have added “Full User” checkbox in the user master screen as shown in the below screenshot:

New Stuff: How to create and add formula on inquiry screen

[User Master]

[User Master]

If the Full User checkbox is ticked, then that particular user will have full rights to check the all user’s purchase related data and if it is not ticked then user can check only those entries which are created by him. As you can see in the above screenshot, full user checkbox is ticked for “ADMIN” user and not ticked for “ABHI” user in the user setup. So there can be two scenarios that either the user is a FULL USER who will have access to check other user’s Purchase entries or he is not a FULL USER who will be restricted and can check only Purchase entries which are created by him.

After that, we have added “My PO” and “None” radio buttons on Order Lines Inquiry Screen and “MY GRN” and “None” radio buttons on Receipt Lines Inquiry screen. Now, we will check how the functionality will work for both the Scenarios.

First scenario: Admin user is logged in. (FULL USER)

[Order Lines Inquiry screen – ADMIN User (My PO Option)]

[Order Lines Inquiry screen – ADMIN User (My PO Option)]

As you can see, when admin user has selected “My PO” option in inquiry screen, only POs created by him are getting displayed but when he has selected “None” option in the below screenshot, he is able to see all the POs which are created by other users also.

[Order Lines Inquiry screen – ADMIN User (None option)]

[Order Lines Inquiry screen – ADMIN User (None option)]

Second scenario: ABHI user is logged in. (not a FULL USER)

[Order Lines Inquiry screen – ABHI User (My PO option)]

[Order Lines Inquiry screen – ABHI User (My PO option)]

In the above screenshot, when ABHI user has selected “My PO” option in inquiry screen, only POs created by him are getting displayed and even when he has selected “None” option as shown in the below screenshot, same data is getting displayed i.e. POs which are created by him. He doesn’t have rights to check other user’s POs because he is not a FULL User as per the user master settings saved in the User setup.

[Order Lines Inquiry screen – ABHI User (None option)]

[Order Lines Inquiry screen – ABHI User (None option)]

Also we have added “My Department” and My Sub-Department” radio buttons on both the screens. If department of the users is same and he has selected my department option then he can see POs created by him and other users as well who are having same department saved in user master. Same functionality will work for Sub-Department option.

Hence with the help of this customization, User will get restricted as per the given rights. And he will not get access to check other user’s Purchase related data.

About Us

Greytrix – a globally recognized and one of the oldest Sage Development Partner is a one-stop solution provider for Sage ERP and Sage CRM organizational needs. Being acknowledged and rewarded for multi-man years of experience, we bring complete end-to-end assistance for your technical consultations, product customizations, data migration, system integrations, third-party add-on development and implementation competence.

Greytrix caters to a wide range of Sage X3, a Sage Business Cloud Solution, offerings. Our unique GUMU™ integrations include Sage X3 for Sage CRMSalesforce.com, Dynamics 365 CRM and Magento eCommerce along with Implementation and Technical Support worldwide for Sage X3. Currently we are Sage X3 Implementation Partner in East Africa, Middle East, Australia, Asia, US, UK. We also offer best-in-class Sage X3 customization and development services, integrated applications such as POS | WMS | Payment Gateway | Shipping System | Business Intelligence | eCommerce and have developed add-ons such as Catch – Weight  and Letter of Credit and India Legislation for Sage X3 to Sage business partners, end users and Sage PSG worldwide.

Greytrix is a recognized Sage champion ISV Partner for GUMU™ Sage X3 – Sage CRM integration also listed on Sage Marketplace; GUMU™ integration for Sage X3 – Salesforce is a 5-star rated app listed on Salesforce AppExchange and GUMU™ integration for Dynamics 365 CRM – Sage ERP listed on Microsoft AppSource.

For more information on Sage X3 Integration and Services, please contact us at x3@greytrix.com, We will like to hear from you.
How to create and add formula on inquiry screen

An
inquiry screen is used to extract information from one or more table and
present it in the from of a grid. It help us to display the records based on
the filter criteria we entered.

In
Sage X3, we have a multiple inquiry screens available such as Stock by product,
stock by lot,stock by site etc where we can search a stock available by product
wise, lot wise and site wise etc. Stock by product screen help us to check the
stock of a product we want to search by specifying the name of the product in
the field. But if want to search based on some condition we can search the same
by creating a formula. Sage X3 provide us a functionality of  creating a formula where we can create a formula
based on any condition.

Sage
X3 allows the user to add formula to inquiries criteria that can help to filter
a specific record based on the condition specified in the formula. Here we want
to search a  stock of a product only  whose product status is active.

To
create a formula follow the below steps:

Navigate
to :
Set
up > General Parameters > Formula

  • Click
    new to create a formula.
  • Select
    the formula type as “Stock selection”.
  • Provide
    the code , description and short description.
  • Enter
    the condition in the formula based on which you need to search a product.

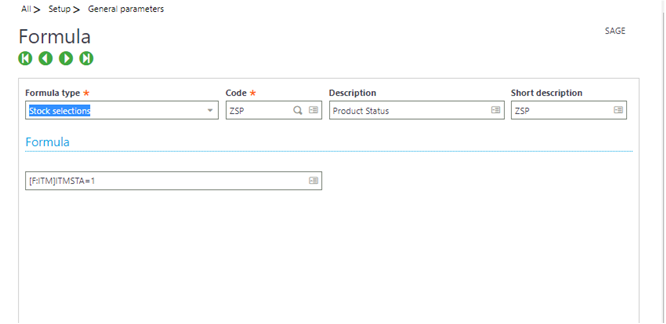
         We have specified [F:ITM]ITMSTA=1 as
we want to search the product whose status is active.

  • Click on the create button. Refer the below figure
Fig: Formula screen

In
this way we have to created a  formula
named as ZSP and now we can use the same formula in inquiry screen.

Follow
the below steps to add the formula in inquiry screen:

Navigate to : Stock > Inquiries > Stock by Product.

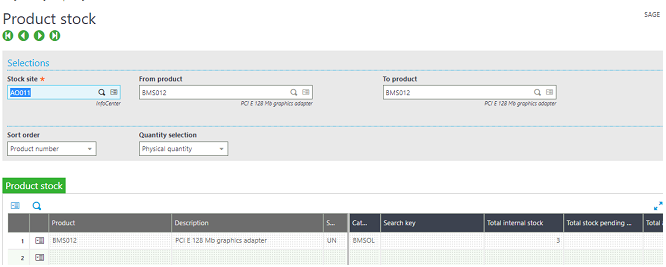
Fig: Product Stock screen

 Here we have specified the
product in the From product and To product field and clicked on search so we
can see the stock available for those product. If we wont specify any product
and click on search then all the products will get display whose status is
active as well as in active.

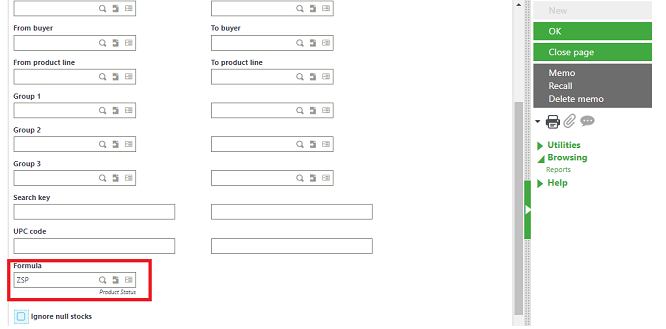
Since we need to search for all those product whose status is active. Click on the criteria button on the right side. Refer the below figure.

Fig: Stock by product screen

The
below window will get pop up. Scroll down to enter the formula.

Select
the formula you have created by clicking on the selection. Then click ok.

Once
you click on OK, then all the product will get display whose status is active.

Refer the below figure.

Fig: Criteria in product stock inquiry screen

In this way we can create a formula based on which we want to search a product and can be used in the inquiry screen.

In this blog, we came to know how we can create a formula and to use those formula in the inquiry screen.

About Us

Greytrix – a globally recognized and one of the oldest Sage Development Partner is a one-stop solution provider for Sage ERP and Sage CRM organizational needs. Being acknowledged and rewarded for multi-man years of experience, we bring complete end-to-end assistance for your technical consultations, product customizations, data migration, system integrations, third-party add-on development and implementation competence.

Greytrix caters to a wide range of Sage X3, a Sage Business Cloud Solution, offerings. Our unique GUMU™ integrations include Sage X3 for Sage CRMSalesforce.com, Dynamics 365 CRM and Magento eCommerce along with Implementation and Technical Support worldwide for Sage X3. Currently we are Sage X3 Implementation Partner in East Africa, Middle East, Australia, Asia, US, UK. We also offer best-in-class Sage X3 customization and development services, integrated applications such as POS | WMS | Payment Gateway | Shipping System | Business Intelligence | eCommerce and have developed add-ons such as Catch – Weight  and Letter of Credit and India Legislation for Sage X3 to Sage business partners, end users and Sage PSG worldwide.

Greytrix is a recognized Sage champion ISV Partner for GUMU™ Sage X3 – Sage CRM integration also listed on Sage Marketplace; GUMU™ integration for Sage X3 – Salesforce is a 5-star rated app listed on Salesforce AppExchange and GUMU™ integration for Dynamics 365 CRM – Sage ERP listed on Microsoft AppSource.

For more information on Sage X3 Integration and Services, please contact us at x3@greytrix.com, We will like to hear from you.

Ultimate Guide to Choose the Right ERP for your eCommerce Business


Ultimate Guide to Choose the Right ERP for your eCommerce Business


In today’s world, simply having an eCommerce software is not enough to influence an effective market strategy. It is essential to build an efficient relationship between your sales channels and backend operations to ensure a good approach towards your marketing, sales, and customer service operations. Apart from this, businesses have to take care of a lot of other things including finances, sales, inventory, and movement. For these tasks, selecting the right ERP for your businesses becomes crucial since there is a lot at stake here.


Businesses often opt for ERP software in order to manage their finances, sales, chains, inventory, customer relationships, and at the same time ensure a great eCommerce shopping and customer experience. We all know what an Enterprise Resource Management Software is, however, how exactly does it help your business? If chosen correctly, ERP can provide you with solutions that your business desires and needs. They can help in tracking workflow, establishing data integrity, and identifying duplication and use these to integrate the various business departments. They also help within improving your budget by bringing all important information on a single platform, automating various tasks, effectively track inventory and sales, generate analytics and report locations, and many more.


1. Understanding what you require


Before you select an ERP software for your business, you need to clearly lay down the objects, requirements, and expectations that you have from the software that you wish to opt for. This will help you in narrowing down the features that you want from your ERP software. Doing so will also ensure that you don’t get influenced by the marketing of various software or the vendor trying to sell you the software. In order to understand the requirements of your business, you can conduct meetings with the various departments of your business like marketing, finance, sales, customer service, and understand the goals, the scope, and areas of improvement, and which ERP software can help you tackle these problems.


2. Flexibility and Scalability


The solution that you are being provided with should be flexible in terms of its abilities as well as the price range depending upon what your requirements are. ERPs should be such that they are able to help you take orders even if you’re away from your desktop. Usually cloud-based are considered to be quite flexible and scalable, allowing you to a number of users which in turn leads to the growth of your business. Cloud-based ERP also eliminates the need for special hardware or staff by keeping the data offsite.


Integrate-Business-Apps-through-APPSeCONNECT


3. Compatible software


As an eCommerce business, you will want to ensure that the ERP solution you select works well with the eCommerce system that is used by your company. The integration and flow of information between these two systems need to be seamless and without any information getting misplaced. Seamless integration will also ensure that there is coherence across the various systems in your business which would ensure no delays in the inventory and shipping of products.


4. Inclusion of CRM


It is no news that good customer service functionality is extremely crucial for any business to survive in this competitive environment. Thus, to ensure that you’re serving your customers well and meeting all the orders in time, your ERP should be such that it has a good Customer Relationship Management (CRM) feature. This is important to that in case of any issues, your ERP solution should be able to recognize them and then go ahead and fix them with ease.


5. Real-time Data and Support


The ERP software that you select for your business should be such that it provides you real-time crucial data that can help you make strategic decisions for your business and get analysis that can help you in understanding the areas where you can improve and meet your needs. Support is also an essential feature that must be there to ensure that the implementation process of ERP is seamless.


Integrate-Business-Apps-through-APPSeCONNECT


6. Get a demo


Before selecting an ERP software for your business, ensure that the vendor is giving you a demo of what’s in store for you. This demo should be designed keeping in mind the requirements of your business including the features you want, functionalities, and workflows that you specifically need for your business. Doing so will help you in making a better decision regarding the choice of ERP that will be the best fit for your business.


In conclusion, one can say that you should carefully evaluate all that an ERP has to offer to you and ensure that it leads to the enhancement of your performance. We hope you found this blog helpful. Let us know your feedback on the comment section below.


Stay safe!


APPSeCONNECT is a smart and robust business application integration platform that seamlessly connects all your business applications with each other to streamline operations and facilitate the free-flow of data across the platforms. It also helps businesses by successfully migrating all their master and transactional data into new systems and helping them boost efficiency. By moving into the region of iPaaS, APPSeCONNECT proves to be a best-in-the-class platform that easily connects systems and automates the business process.


Now, you can easily connect all your business applications under one single platform to automate the business process!Integrate-Business-Apps-through-APPSeCONNECT


You may also like:
Things to Consider while Migrating Data to Microsoft Dynamics 365 CRM
Salesforce Lightning Experience – How to Build Custom Pages
Data Integration in the Healthcare Industry: How iPaaS is Revolutionizing the Healthcare Sector